BATTLEFIELD SET-UP
& SCENARIOS
The section that follows presents rules for setting up a battlefield to represent the underhive, along with tables to generate scenarios within Necromunda campaigns.
BATTLEFIELD SET-UP
The default method for setting up the battlefield is as follows:
UNDERHIVE
The battlefields of the underhive vary vastly, from complexes of cramped tunnels, raucous marketplaces, rogue factoria and foundries to gang strongholds and even bustling settlements. The thing they all have in common is that they are fully enclosed, protected from the unpredictable and harsh weather of the wastes.
For Underhive battles, between a 3'x3' and a 4'x4' battlefield is ideal, although much larger or smaller battlefields are also possible! Starting with the defender, players alternate placing terrain features upon the battlefield. Once one player declines to place any terrain, then the other player may place one more piece of terrain. Alternatively, if using Zone Mortalis Tiles, players alternate placing the tiles on the battlefield.
Then, starting with the defender again, players alternate placing obstacles (see page 67) and other small terrain features. Once one player passes, the other player may place one more obstacle.
TUNNEL WARFARE
When creating an Underhive battlefield, the default is that the ceiling is high up above the ground and so walls can be climbed up onto and stairs and ladders used. However, if both players agree, the claustrophobic confines of tunnel battles can be recreated by stating that the ceiling is at the height of one wall section, meaning walls cannot be climbed over, and stairs and ladders cannot be used.
CREW SELECTION
Each player chooses a starting crew for the scenario, using one of the following methods as determined by the Crew table (see page 147):
RANDOM SELECTION (X)
When the Crew table instructs players to use Random Selection (X) to choose their starting crew, the following method is used:
The player makes a deck of their Model Cards. The deck may not include any models unable to take part in the battle.
The deck may only contain one randomly selected Model Card for any models who have multiple Model Cards.
This deck is then shuffled and a number of Model Cards equal to the number shown in brackets is dealt out. This is the player's starting crew.
CUSTOM SELECTION (X)
When the Crew table instructs players to use Custom Selection (X) to choose their starting crew, the following method is used:
The player chooses their crew, selecting the Model Cards of the models they wish to use, equal to the number shown in brackets.
If any models have multiple Model Cards, the player chooses which equipment set the model will use for the battle.
Models that are unable to take part in the battle may not be selected.
HYBRID SELECTION (X+Y)
When the Crew table instructs players to use Hybrid Selection (X+Y) to choose their starting crew, the following method is used:
The player chooses a number of models equal to the first number (X) to be part of their starting crew and sets their Model Cards to one side. - If any models have multiple Model Cards, the player chooses which equipment load-out the model will use for the battle. - Models that are unable to take part in the battle may not be selected.
The player then makes a deck of any remaining Model Cards. - If any models have multiple Model Cards, randomly determine which Model Card is added to the deck. - Models that are unable to take part in the battle may not be included in the deck.
The deck is then shuffled and a number of Model Cards equal to the second number (Y) shown in brackets are dealt out and added to their starting crew.
REINFORCEMENTS (X)
If the Crew table says that a gang has Reinforcements (X) available, then all models who are not part of the starting crew and able to take part in the battle are shuffled together and then a number of Model Cards equal to X are dealt out to form the Reinforcements deck. If a model has multiple Model Cards, randomly determine which one is added to the Reinforcements deck.
Reinforcements always arrive in the Reinforcements step of the End phase. The Crew table will state the round(s) on which Reinforcements arrive and how many.
Starting with the player who won Priority this round, players take turns randomly drawing Reinforcements from their Reinforcements deck. They continue alternating drawing cards until each player has either deployed the number of Reinforcements that are due to arrive this round, or they have run out of Model Cards in their Reinforcements deck. For each model drawn, a D6 is rolled. - On a 3+, the controlling player deploys them on any battlefield edge at least 9" away from all enemy models. - On a 1-2, the controlling player deploys them on any battlefield edge at least 12" away from all enemy models.
DEPLOYMENT
The Deployment table section will detail where the deployment zones are for the battle. When deploying models, starting with the defender, players alternate placing a model in their deployment zone. If one player finishes deploying their starting crew while the other player still has models to deploy, then all remaining models are deployed.
VISIBILITY (X")
Battles on Necromunda are not always fought in bright light, either because of the smog of industry filling the underhive, lumens failing due to lack of maintenance or sporadic power outages.
These conditions are represented by the following special rules:
- Models cannot draw Line of Sight to targets more than X" away unless the target is using a photolumen. Models using photo-lumens, photo-goggles or infra-sights extend this range by 9" (note: these and similar effects do not stack).
PITCH BLACK
Underhive battlefields are almost always shrouded in darkness. On a good cycle, the dome lumens might be mostly lit up, casting weak light throughout the hive's tunnels and chambers; just as often, however, these fail, plunging the entire area into darkness. If both players wish to use the Pitch Black rules, roll on the table below, after setting up the battlefield but before choosing deployment zones or deploying any models.
PITCH BLACK TABLE
| D6 | Result |
|---|---|
| 1 | Full Night Cycle: The Visibility (3") rule is in effect. |
| 2-3 | Near Night: The Visibility (6") rule is in effect. |
| 4-5 | Near Day: The Visibility (12") rule is in effect. |
| 6 | Full Day Cycle: The Visibility (24") rule is in effect. |
SCENARIO GENERATION TABLES
No two battles in the underhive are ever the same, and rarely are they fair! When a challenge is made, the scenario is generated by rolling on each of the following four tables.
ARBITRATOR'S TOOLKIT: CUSTOMISING THESE TABLES
This book only provides a set table for each of these sections, future supplements will provide more options. The Arbitrator is free to swap these additional ones into the tables in order to customise the campaign. If they wish, they may change the tables each Cycle to represent the changing battle for the underhive, increase or decrease the size of these tables or even state which set will be used for each battle.
DEPLOYMENT TABLE
In order to generate the Deployment map for the scenario, the challenger rolls a D6 on the following table:
Deployment Zone D6 Sniping Range: The winner of a roll-off 1 chooses a battlefield edge, their opponent takes the opposite battlefield edge. Both gang's deployment zone is anywhere between their battlefield edge and 12" from a line drawn horizontally through the centre of the battlefield.
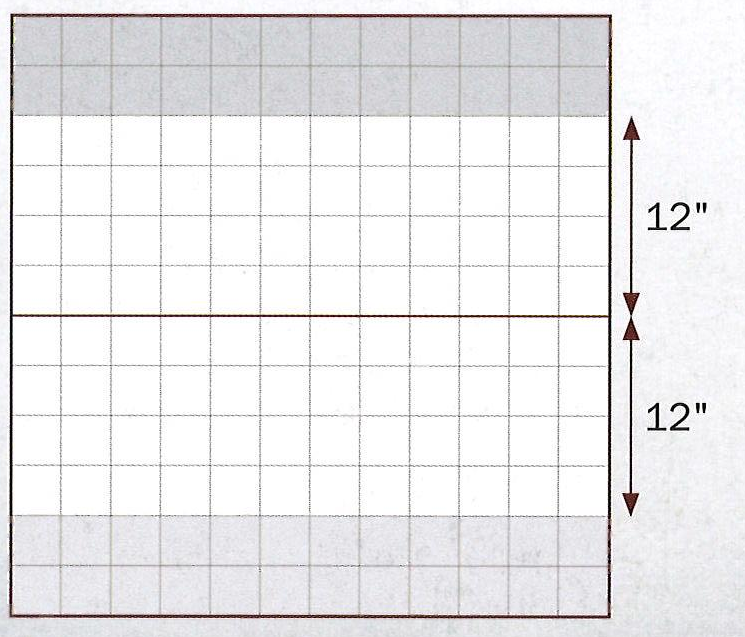 Sniping Range deployment diagram Open full-size chart ↗
Deployment Zone D6 Face Off: The winner of a roll-off chooses 2 a battlefield edge, their opponent takes the opposite battlefield edge. Both gang's deployment zone is anywhere between their battlefield edge and 9" from a line drawn horizontally through the centre of the battlefield.
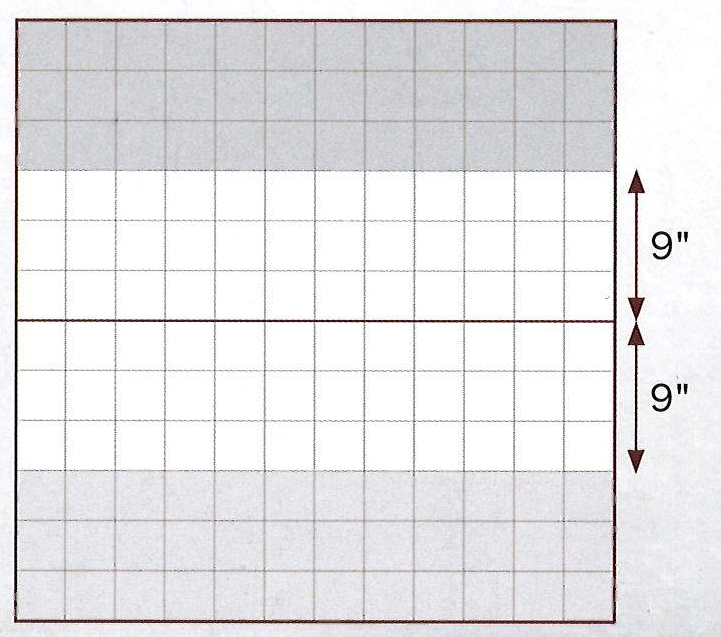 Face Off deployment diagram Open full-size chart ↗
Deployment Zone D6 Stand Off: The winner of a roll-off chooses 3 a battlefield edge, their opponent takes the opposite battlefield edge. Both gang's deployment zone is anywhere between their battlefield edge and 6" from a line drawn horizontally through the centre of the battlefield.
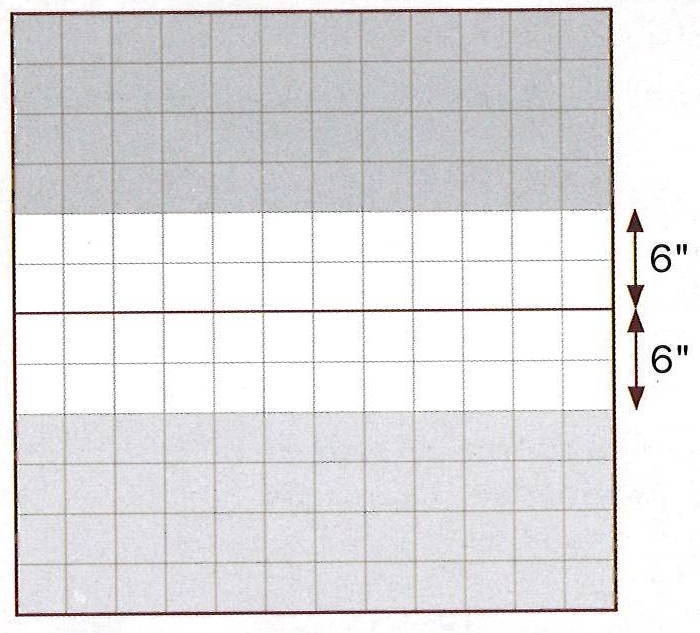 Stand Off deployment diagram Open full-size chart ↗
Deployment Zone D6 Free For All: The winner of a roll-off chooses 5 a battlefield quarter, their opponent takes the opposite battlefield quarter. Each gang's deployment zone is anywhere within their battlefield quarter at least 9" from the centre of the battlefield.
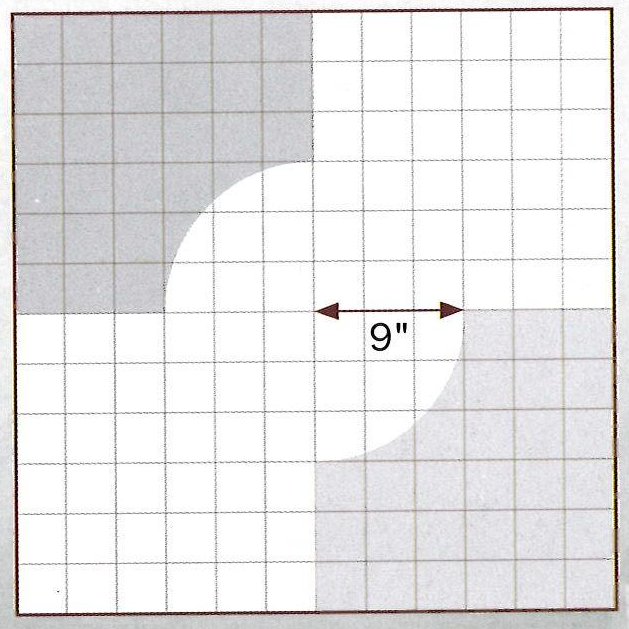 Free For All deployment diagram Open full-size chart ↗
Deployment Zone D6 Ambush: The defender's deployment zone is 4 anywhere on the battlefield within an area up to 6" from the centre of the battlefield. The attacker's deployment zone is anywhere on the battlefield at least 12" from the centre of the battlefield.
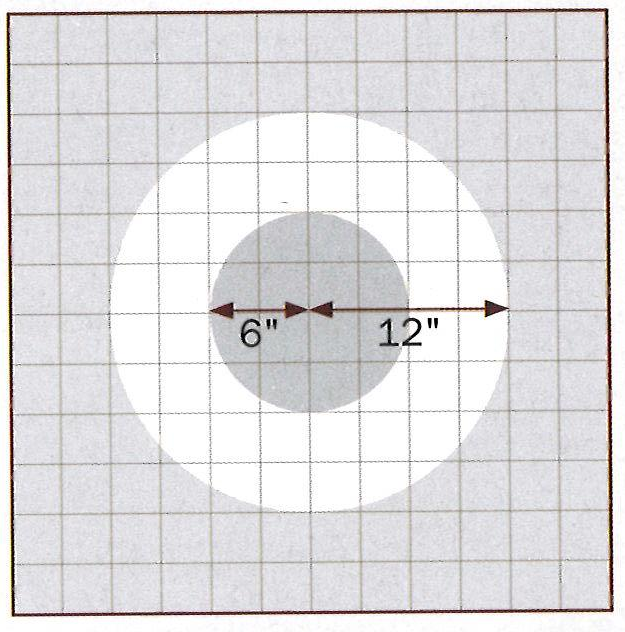 Ambush deployment diagram Open full-size chart ↗
Deployment Zone D6 Chance Encounter: The winner of a roll- 6 off chooses a corner of the battlefield. Their deployment zone is anywhere on the battlefield within 9" of that corner and the opposite corner. Their opponent's deployment zone is anywhere on the battlefield within 9" of the other two corners. When deploying starting gangs, they must be split as evenly as possible between each player's two deployment zones.
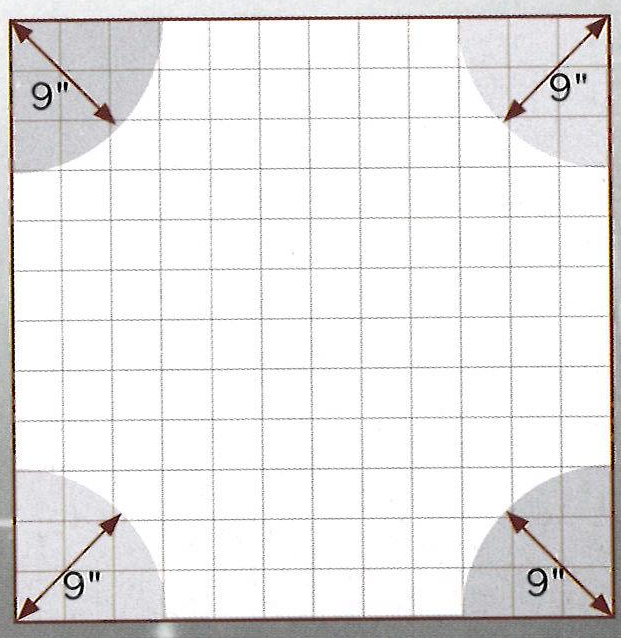 Chance Encounter deployment diagram Open full-size chart ↗
OBJECTIVE TABLE
The Objective table is used to determine the main objective each gang is trying to accomplish in battle. The reward for winning the scenario is determined by the phase of the campaign (see page 123). In order to generate the objective, the challenger rolls a D6 and consults the following table:
| D6 | Objective |
|---|---|
| 1 | King of the Hive Place a single objective in the centre of the battlefield. During the Check For Victory step of the End phase, it is worth 1 VP. Victory: The winner is the first player to reach 3 VP. If only one player has at least one model on the battlefield, they are victorious. Draw: If neither player has any models on the battlefield, the battle is a draw. |
| 2 | Turf War From round three onwards, if only one player has models who are not Seriously Injured/Damaged within 9" of the centre of the battlefield during the Check For Victory step of the End phase they win. Victory: If only one player has at least one model on the battlefield, they are victorious. Draw: If neither player has any models on the battlefield, the battle is a draw. |
| 3 | Tunnel Clash Place an objective in the centre of the battlefield then, starting with the winner of a roll-off, each player places an objective at least 6" away from any other objective and at least 6" away from any battlefield edge. During the Check For Victory step of the End phase, if a player controls two objectives, they score 1 VP. Victory: The winner is the first player to reach 3 VP. If only one player has at least one model on the battlefield, they are victorious. Draw: If neither player has any models on the battlefield, the battle is a draw. |
| 4 | Object Lesson During the Check For Victory step of the End phase, both gangs earn VP for any enemy models that went Out of Action that round. 1 VP is earned for each enemy model that went Out of Action, an additional 1 VP is earned if the model had the Leader, Champion or Brute Subtype and an additional 1 VP if they were taken Out of Action as part of a Fight, Coup de Grace or Sabotage action. Victory: The winner is the first player to reach 10 VP. If only one player has at least one model on the battlefield, they are victorious. Draw: If both players have at least 10 VP, or neither player has any models on the battlefield, the battle is a draw. |
| 5 | Flank 'em The attacker picks a battlefield edge and places an objective in the centre of it, 6" onto the battlefield. The defender then places an objective in the same position on the opposite battlefield edge. During the Check For Victory step of the End phase, if a gang controls both objectives they earn 1 VP. Victory: The winner is the first player to reach 3 VP. If only one player has at least one model on the battlefield, they are victorious. Draw: If neither player has any models on the battlefield, the battle is a draw. |
| 6 | Burn Them Out Starting with the defender, each player takes turns placing an objective in their opponent's deployment zone until they have each placed three objectives. Each objective must be deployed at least 6" from all other objectives, if possible. During the Check For Victory step of the End phase, if a gang controls an objective in their opponent's deployment zone they score 1 VP and remove the objective. Victory: The winner is the first player to reach 2 VP. If only one player has at least one model on the battlefield, they are victorious. Draw: If both players have at least 2 VP or neither player has any models on the battlefield, the battle is a draw. |
SIDE JOB TABLE
The Side Jobs table is used to determine a Side Job for each gang that they can complete for a payout. The reward for completing a Side Job is determined by the campaign phase (see page 123). In order to generate the Side Job, each player rolls a D6 and consults the following table:
| D6 | Side Job |
|---|---|
| 1 | Stitch 'em Up!: When performing a Coup de Grace action, instead of making a Strength roll-off to take the enemy Fighter Out of Action, your Fighters may plant evidence on the Seriously Injured model. If at least one enemy Fighter had evidence planted on them by the end of the battle (even if they are no longer on the battlefield), your gang has achieved this Side Job. |
| 2 | The Package: At the beginning of the battle, after both crews have deployed, choose one of your Fighters deployed on the battlefield and give them a marker to represent the package. If, during the Check For Victory step of the End phase of the third round, or any round thereafter, the Fighter carrying the package is in base contact with a battlefield edge in your opponent's deployment zone (or in the centre of the battlefield if your opponent's deployment zone has no battlefield edges), they may remove the marker and your gang has achieved this Side Job. |
| 3 | Settle a Score: After both crews have been deployed, randomly select one of your opponent's models (not including the enemy Leader) deployed on the battlefield to be the target and announce which model is selected. During the Check For Victory step of the End phase of any round, if the selected model has been taken Out of Action or left the battlefield for any reason, then your gang has achieved this Side Job. |
| 4 | Crippling Strike: If, during the Check For Victory step of the End phase of any round, at least half of your opponent's models on the battlefield are Seriously Injured/Damaged or Engaged, then your gang has achieved this Side Job. |
| 5 | Spread Unrest: Any Active Fighter without the Beast Subtype in your gang may perform the Graffiti (Double) action as long as they are within your opponent's deployment zone, or within 6" of the centre of the battlefield if your opponent has no deployment zone. If at least one Fighter performed this action during the battle (even if the Fighter is no longer on the battlefield), then your gang has achieved this Side Job. |
| 6 | Protect the Future: After both crews have been deployed, randomly select one of your Prospects deployed on the battlefield to be protected and announce which Fighter is selected. If your starting crew contains no Prospects, randomly select a Ganger instead. If your starting crew also contains no Gangers, generate a new Side Job. If the selected Fighter is still on the battlefield at the end of the battle, then your gang has achieved this Side Job. |
CREW TABLE
The Crew table is used to determine how each gang selects their starting crew for the battle. In order to generate the Crew selection, the challenged player rolls a D6 and consults the following table:
| D6 | Crew |
|---|---|
| 1 | Escalating Engagement: Both gangs use the Hybrid (3+03) method to determine their starting crew. Both gangs use the Reinforcements (5) rule with D3 Reinforcements arriving each round starting from the first. |
| 2 | Hold Nothing Back!: Both gangs use the Custom (10) method to determine their starting crew. |
| 3 | Patrol: Both gangs use the Hybrid (3+4) method to determine their starting crew. |
| 4 | Surprise Attack: The attacker uses the Hybrid (4+4) method to determine their starting crew. The defender uses the Custom (3) method to determine their starting crew. The defender uses the Reinforcements (7) rule with D3 Reinforcements arriving each round starting from the first. |
| 5 | Strike Force: Both gangs use the Custom (5) method to determine their starting crew. |
| 6 | Scouting Force: Both gangs use the Hybrid (D3+5) method to determine their starting crew. |
CORE RULES
This section contains rules that allow players to fight out the bitter and vicious skirmishes that punctuate the daily lives of the gangs and groups in the underhive, and out in the ash wastes. The Round sequence, activating models, attacking the enemy with ranged weapons or when in close combat, suffering and recovering from injuries, models losing their bottle and fleeing - all are covered over the following pages.
THE PRE-BATTLE SEQUENCE
Prior to any battle, there are several important steps that need to take place, as listed below. Some of these only apply during Campaign play, and can therefore be skipped during Skirmish play, as mentioned in the appropriate entries. Whatever the case, this sequence must be followed in the order shown, and must be done while both players are present.
The Pre-battle Sequence has seven steps:
Make a Challenge & Stake Territory
Determine Scenario
Set Up the Battlefield
Choose Crews
Announce Battlefield Effects
Gang Tactics
Deployment
1. MAKE A CHALLENGE &
STAKE TERRITORY
For a battle to be fought, a challenge must be issued and accepted. In Campaign play, challenges are handled as described by the Arbitrator, though campaigns will provide guidance. In Skirmish play, a challenge is issued and accepted when two players decide to play a battle.
In Campaign play, an eligible Territory is nominated as the stake for the battle (as described in each campaign).
2. DETERMINE SCENARIO
In Campaign play, the scenario will be generated following the rules presented on pages 144-147. In Skirmish play, players may instead simply choose the result on each table to create the scenario they wish to play.
DETERMINING THE ATTACKER & DEFENDER
In Campaign play, the player who issued the challenge is the attacker. In Skirmish play, both players should roll a D6, with the player who rolls the highest choosing who is the attacker and who is the defender.
3. SET UP THE BATTLEFIELD
The players now set up the battlefield. The default methods are detailed in full on page 140.
4. CHOOSE CREWS
After the battlefield has been set up, before gangs can be deployed, players must select their starting crews for the battle ahead. The scenario's Crew table will detail the method of selection to be used, how many and what kind of models can be selected. The selection methods are explained in full on page 141.
RECRUIT HIRED GUNS
Players can spend credits to recruit Hired Guns. In Campaign play, the gang may spend credits from those it has in its Stash. In Skirmish play, any unspent credits left over from creating the gang can be spent to recruit Hired Guns. Additionally, in Campaign play, gangs may be able to recruit Hired Guns through other means, such as Boons granted by Territories.
If both players wish to recruit Hired Guns, the player with the higher Gang Rating must do so first.
5.ANNOUNCE
BATTLEFIELD EFFECTS
In Campaign play, many of the Territories apply a Battlefield Effect to any battles fought for their control. Players should announce which Territories are applying Battlefield Effects to the upcoming battle and what they are.
In Skirmish play, this step of the Pre-battle Sequence can be ignored.
6. GANG TACTICS
Each player may select one of the Gang Tactics they have access to. During the battle, each selected Gang Tactic may be used once (see page 148).
UNDERDOG BONUS
If one player's Gang Rating is at least 200 credits less than their opponent's Gang Rating, they may select an additional Gang Tactic they have access to for the battle for each full 200 credits difference in Gang Rating.
7. DEPLOYMENT
The final step of the Pre-battle Sequence is deployment, in which the players, starting with the Defender, set their gangs up on the battlefield, ready for the battle ahead. Each scenario's Deployment table will give details of the size and location of 'deployment zones', the name given to the areas in which gangs can be set up. Deployment is explained in full on page 142.
SCENARIO SELECTION
When a challenge is issued, roll on the tables on pages 144-147 to generate the scenario. For all scenarios, the player that issued the challenge is the attacker.
ESCHER SIDE JOBS
When generating Side Jobs for a scenario, an Escher gang may generate their Side Jobs from the table below instead of the one presented in the Necromunda Skirmish: Core Rulebook.
| D6 | Side job |
|---|---|
| 1 | Chemical Reign: Make a note of each time an enemy Fighter is hit by a weapon with the Toxin (X+) trait and loses a Wound. If, during the Check For Victory step of the End phase of any round, the total number of times this has happened is at least three, then your gang has completed this Side Job. |
| 2 | Maiden, Mother, Matriarch: If, during the Check For Victory step of the End phase of any round, a friendly Prospect, a friendly Ganger and a friendly Leader or Champion are all within 6" of the centre of the battlefield and are all either Active or Suppressed, then your gang has completed this Side Job. |
| 3 | Hunt Together: If, during the Check For Victory step of the End phase of any round, a friendly Fighter and a friendly Pet both performed a Charge or Engage action targeting the same enemy Fighter this round, then your gang has completed this Side Job. |
| 4 | Cut Off the Head: If, during the Check For Victory step of the End phase of any round, either all enemy Leaders and Champions on the battlefield are Seriously Injured or there are no enemy Leaders or Champions on the battlefield, then your gang has completed this Side Job. |
| 5 | Experimental Chem: After both crews have deployed, choose one of your Fighters deployed on the battlefield. They are equipped with three doses of Bolt, an experimental Stimm, for the duration of the battle. When it is used via the Administer Dose action, roll a D6 to determine the effect on the target. On a result of a 1, something has gone wrong with the chem and they suffer a Str -, AP -, L1 Hit that wounds automatically and ignores Saves. On a result of a 2, they are Suppressed. On a result of a 3+, they increase their Movement characteristic by 1" for the remainder of the battle. If, during the Check For Victory step of the End phase of any round, all three doses have been used, then your gang has completed this Side Job. |
| 6 | Murder Run: If, during the Check For Victory step of the End phase of any round, at least three different enemy Fighters were taken Out of Action or Seriously Injured by friendly models during the round, your gang has completed this Side Job. |
GOLIATH SIDE JOBS
When generating Side Jobs for a scenario, a Goliath gang may generate their Side Jobs from the table below instead of the one presented in the Necromunda Skirmish: Core Rulebook.
| D6 | Side Job |
|---|---|
| 1 | Pit Fight: Randomly select one of your Fighters deployed on the battlefield. If during the Wrap Up step of the Post-battle sequence that Fighter did not use any weapon without the Melee trait then your gang has achieved this Side Job. |
| 2 | Personal Vendetta: Select either your Leader or one of your Champions, and either the enemy Leader or one of their Champions deployed on the battlefield. If there are no eligible Fighters deployed on the battlefield, you may instead select any Fighter. If, at the end of the battle, your Fighter took the enemy Fighter Out of Action then your gang has achieved this Side Job. |
| 3 | Wreck the Place!: An Active Fighter in your gang may perform the Vandalise (Single) action as long as they are within your opponent's deployment zone, or within 6" of the centre of the battlefield if your opponent has no deployment zone by rolling a D6 and adding the Strength characteristic. If the total is 6 or more, the action has been successfully performed. If, at the end of the battle, this action was successfully performed at least two times, your gang has achieved this Side Job. |
| 4 | Maximum Force: If, at the end of the battle, at least three enemy Fighters were taken Out of Action as the result of a Fight action, your gang has achieved this Side Job. |
| 5 | Hold the Forge!: Select a piece of terrain at least 12" from your deployment zone, or any piece of terrain if you have no deployment zone. If, at the end of the battle, there are no enemy models within 3" of the selected terrain, your gang has achieved this Side Job. |
| 6 | Prove Your Worth!: If, during the Check For Victory step of the End phase of any round, a friendly Fighter was Engaged by two Fighters at the same time this round and that Fighter is still on the battlefield and not Seriously Injured, your gang has achieved this Side Job. |