From Core Rules. Read this book’s lore. Readable tables and original source diagrams.
PDF page 33 / Printed page 31
### RULES INTRODUCTION
Before starting on the core rules of the game, it is worth establishing some general principles and conventions to keep in mind. This section deals with measurement, Line of Sight and cover, offers an overview of terrain and explains the different dice and their uses. Additionally, this section explains model profiles and Statuses, as well as weapon profiles.
PDF page 34 / Printed page 32
### WHAT SORT
### OF GAME IS
### FIRST PRINCIPLES
In any game, there are certain conventions for all players to be aware of.
### NECROMUNDA
In Necromunda, these include such things as how to roll and read dice,
### SKIRMISH?
how distances are measured, when it is acceptable to change one's mind,
At its heart, Necromunda is a way to explore the and so forth.
### FIGHTERS, VEHICLES & MODELS
ongoing story of
In games of Necromunda, players use finely detailed models to represent their a series of gangs gangs on the tabletop, and to represent the vehicles of the ash wastes. In game vying for supremacy terms, it helps to be precise in how such things are defined so that players can in the brutal underhive of one of the great hive cities easily interpret the rules:
Any model that represents a single humanoid or a single animal is referred to of Necromunda. It as a 'Fighter' in the rules and has the Fighter Type. This could be a lowly gang is not designed to member, a renowned hired gun, or even an exotic beast owned by a mighty gang be a competitive game, but instead embraces the
Champion (see pages 43-46).
Any model that is mounted on an animal or bike is a Fighter with the Mounted chaos and glorious randomness of close quarters
Subtype (see page 45).
Any model that represents a Vehicle of any type, be it a small Vehicle operated by battles between a single driver or large Vehicle crewed by many, is referred to as a 'Vehicle' in the desperate gangers, where every cycle could be their last ...
rules and has the Vehicle Type (see pages 43-4 7).
Where the rules use the terms 'Fighter' or 'Vehicle', they are referring specifically to models of that Type. However, where the rules use the term 'model' or 'models', they are referring to both Fighters and Vehicles.
### CONTROLLING & OPPOSING PLAYER
Frequently, rules will refer to the controlling player - this is the player whose model is being affected; the opposing player is their opponent.
### TAKE-BACKS & CHANGING ONE'S MIND
It is not uncommon for players of any game to second-guess themselves occasionally, saying they are about to do something before immediately changing their mind. As a general rule, players should be tolerant of this in their opponents, as they will likely do it themselves! However, once dice have been rolled for any reason, players must abide by their decision; they can no longer go back and change anything that came before the dice roll!
PDF page 35 / Printed page 33
### MEASURING DISTANCES
In games of Necromunda, all distances are measured in inches (") with a range ruler or tape measure. Distances can be measured at any time by either player.
Distances between models and any other battlefield objects (terrain features, objectives and so forth) are measured from the closest point of one base to the closest point of the other. If a model or an object does not have a base, measure to or from the closest point of the model or object overall.
### MEASUREMENT &
### SOLID TERRAIN FEATURES
Some terrain features, such as the thick walls that separate corridors, the floors and ceilings that separate levels, or large rock formations looming up from the landscape are defined by the rules as 'solid'. Unless stated, distances cannot be measured through any terrain feature defined as being solid.
If two models are at different elevations, or levels, measure the distance directly from one base to the other.
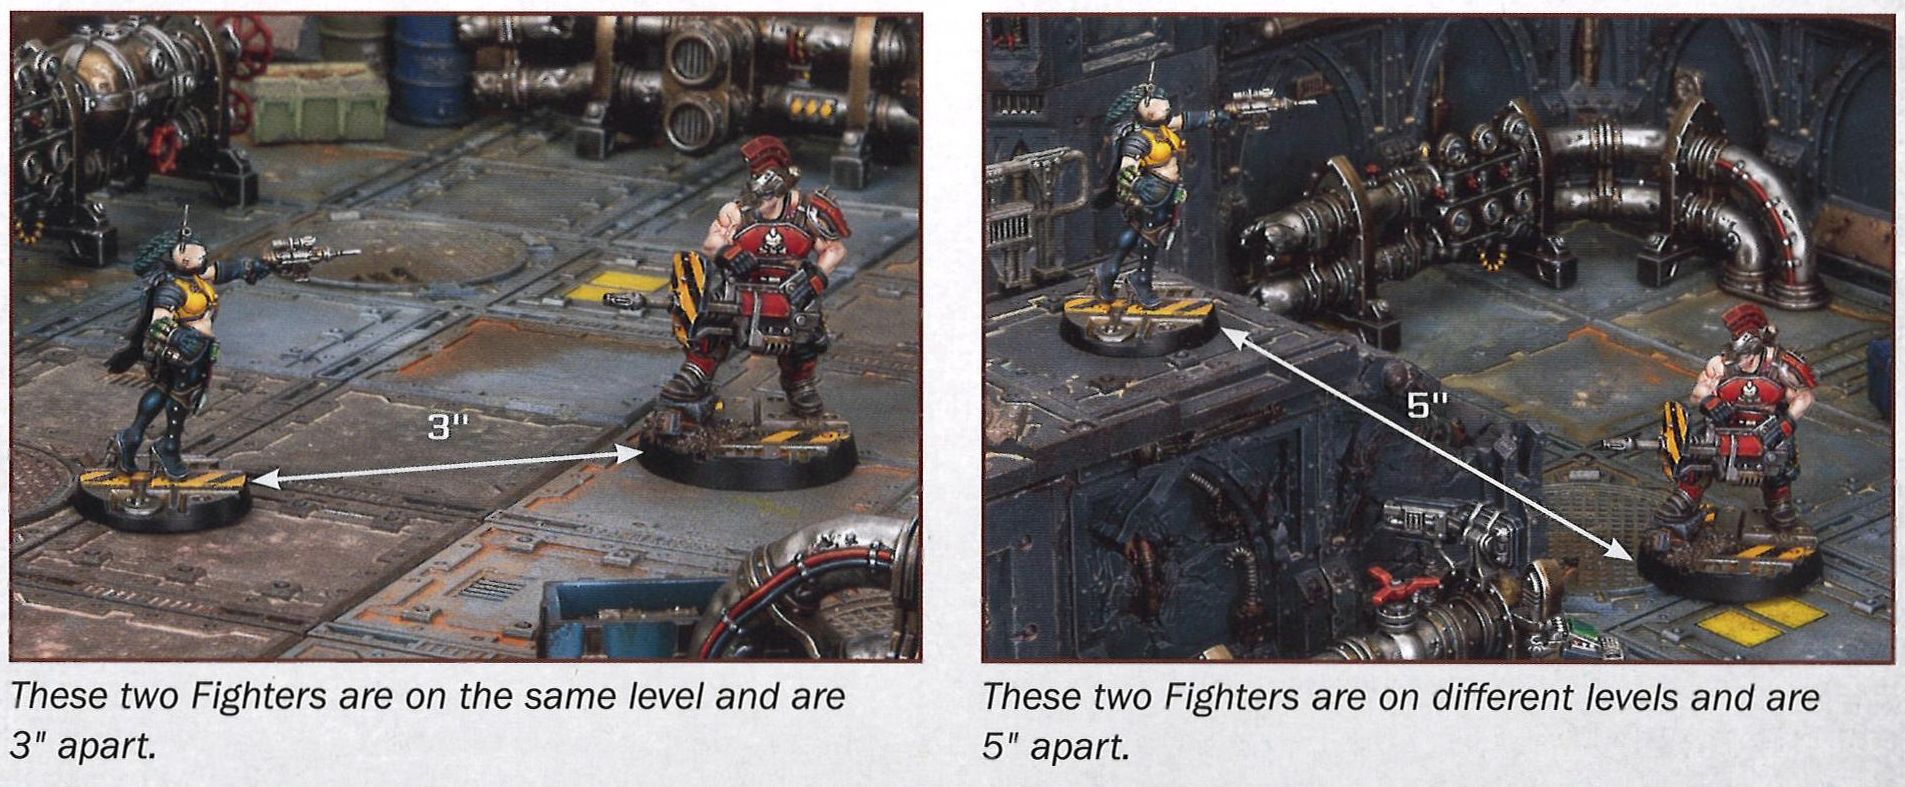
These two Fighters are on the same level and are 3" apart.
### ARBITRATOR'S TOOLKITS
Throughout these rules you will find Arbitrator's Toolkits. These are optional rules that can be used in battles to add additional character if both players agree before the battle or the campaign Arbitrator wishes.
These two Fighters are on different levels and are 5" apart.
### ARBITRATOR'S TOOLKIT:
### NO PRE-MEASURING
If an Arbitrator wishes, in their campaign they may represent the uncertainty of gang warfare in the underhive by allowing players to measure distances only after an action has been declared. If the action is not possible (due to a target being outside a weapon's Long Range), the model still attempts it, and would still make a shot and so potentially suffer the effects of the Unstable, Ammo (X+) and similar traits. For example, with the Unstable trait a Hit roll would still be made to see if the weapon backfires, but regardless of the result the shot would miss.
PDF page 36 / Printed page 34
### LINE OF SIGHT & COVER
Visibility in Necromunda is vitally important; models need to be able to see where their enemies are in order to shoot at them. But in the dense and dark terrain of the underhive, or within the thick clouds of dust and pollution that hang over the ash wastes, a clear and unobstructed Line of Sight is often hard to find.
### FIGHTER VISION ARCS
Fighters are assumed to be constantly looking around them, keeping a wary eye, ear and nose out for danger. As such, all models have a 360° vision arc.
### THE ARC (X) TRAIT
A weapon with this trait may only target enemy models in the model's arcs denoted by X.
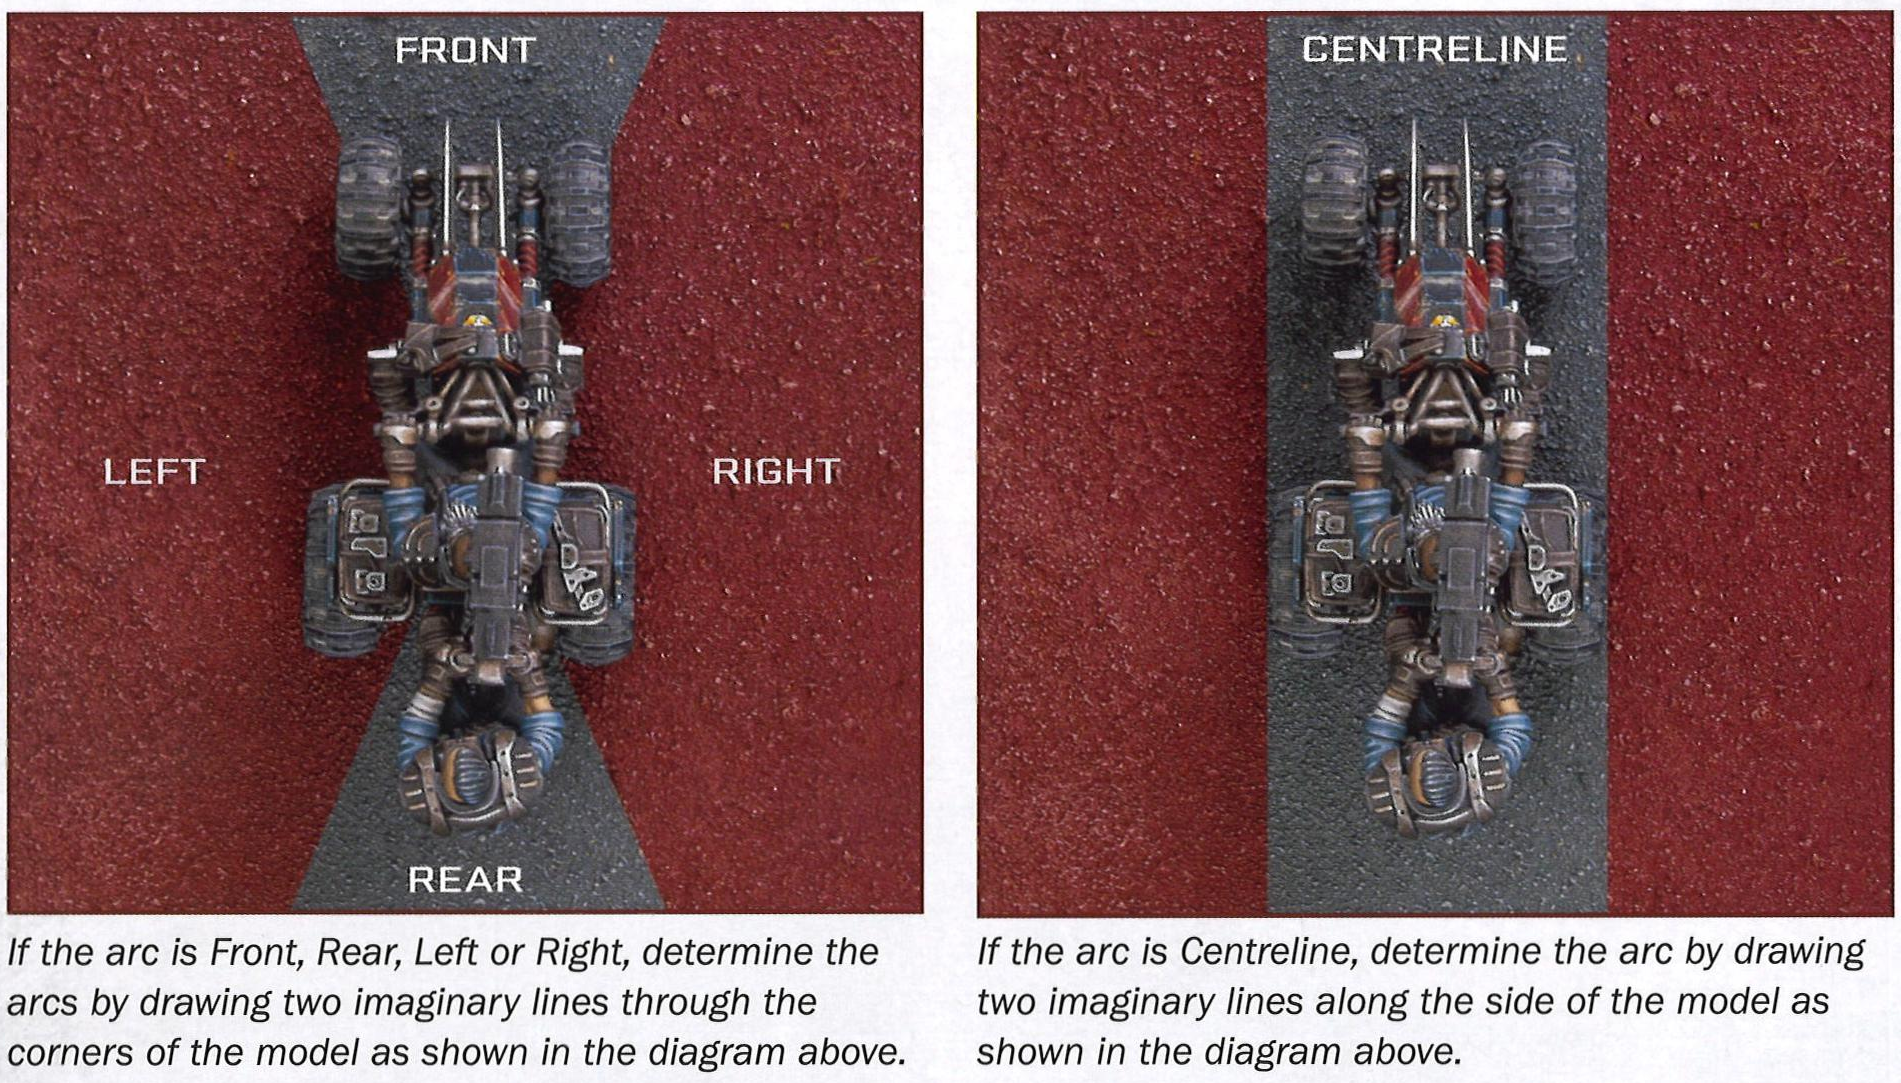
If the arc is Front, Rear, Left or Right, determine the arcs by drawing two imaginary lines through the corners of the model as shown in the diagram above.
If the arc is Centreline, determine the arc by drawing two imaginary lines along the side of the model as shown in the diagram above.
Some weapons may be able to target enemy models in multiple arcs, in which case each arc will be listed in brackets. If a weapon does not have this trait, it is assumed to have 360° vision.
PDF page 37 / Printed page 35
### LINE OF SIGHT
A model's Line of Sight (i.e., what they can see) is determined by the presence of terrain and other models, and can be checked at any time.
To check one model's Line of Sight to another model, stoop down to look from the first model's point of view:
- If a straight, uninterrupted line can be drawn from the first model to any part of the other model", the first model has a Line of Sight to them.
- If no such line can be drawn to the other model due to intervening terrain or the presence of other models", the first model does not have a Line of Sight to them.
*Excluding their base or any insignificant elements, such as a protruding hairstyle, the barrel of a gun or a spike from their armour.
### LINE OF SIGHT &
### SOLID TERRAIN FEATURES
Solid terrain such as the walls between corridors, the floors and ceilings between levels, or the large rock formations looming up from the landscape are, by their nature, impossible to see through. Unless stated otherwise, a Line of Sight can never be drawn through any terrain feature defined as being solid.
### DESIGNER'S NOTE:
### AGREEING ON LINE OF SIGHT
It pays to be gracious when your opponent claims Line of Sight - in other words, if they claim their model has Line of Sight and your immediate thought is anything less than "There is no way that model has Line of Sight!", we recommend allowing it. If both players take this approach (with both Line of Sight and cover), the game will flow more smoothly and will be much more satisfying. If players cannot agree whether one model has a Line of Sight to another, it should be settled by rolling oft (see page 39).
PDF page 38 / Printed page 36
### COVER
In the majority of cases, the Line of Sight between one model and another will need to be checked for the purposes of shooting and, in many cases, a model that wishes to shoot at an enemy model may be able to draw a Line of Sight to only part of their intended target.
To see if a target is in cover, stoop down to look from the attacker's point of view, in exactly the same manner as described for checking Line of Sight. However, when checking to see if the target is in cover, disregard any friendly Fighters in base contact with the attacker - moving them aside temporarily if necessary, as long as they return to the original place once the shot has been resolved:
- If the target is fully visible, they are not in cover (i.e., they are 'in the open').
- If any of the target is obscured by terrain or models, they are in cover.
As with Line of Sight, ignore the target's base and any minor elements such as hair, gun barrels and spikes and again, if a decision cannot be reached, the players should roll off.
The benefits of cover are discussed in more detail under the rules for making Save rolls on page 76.
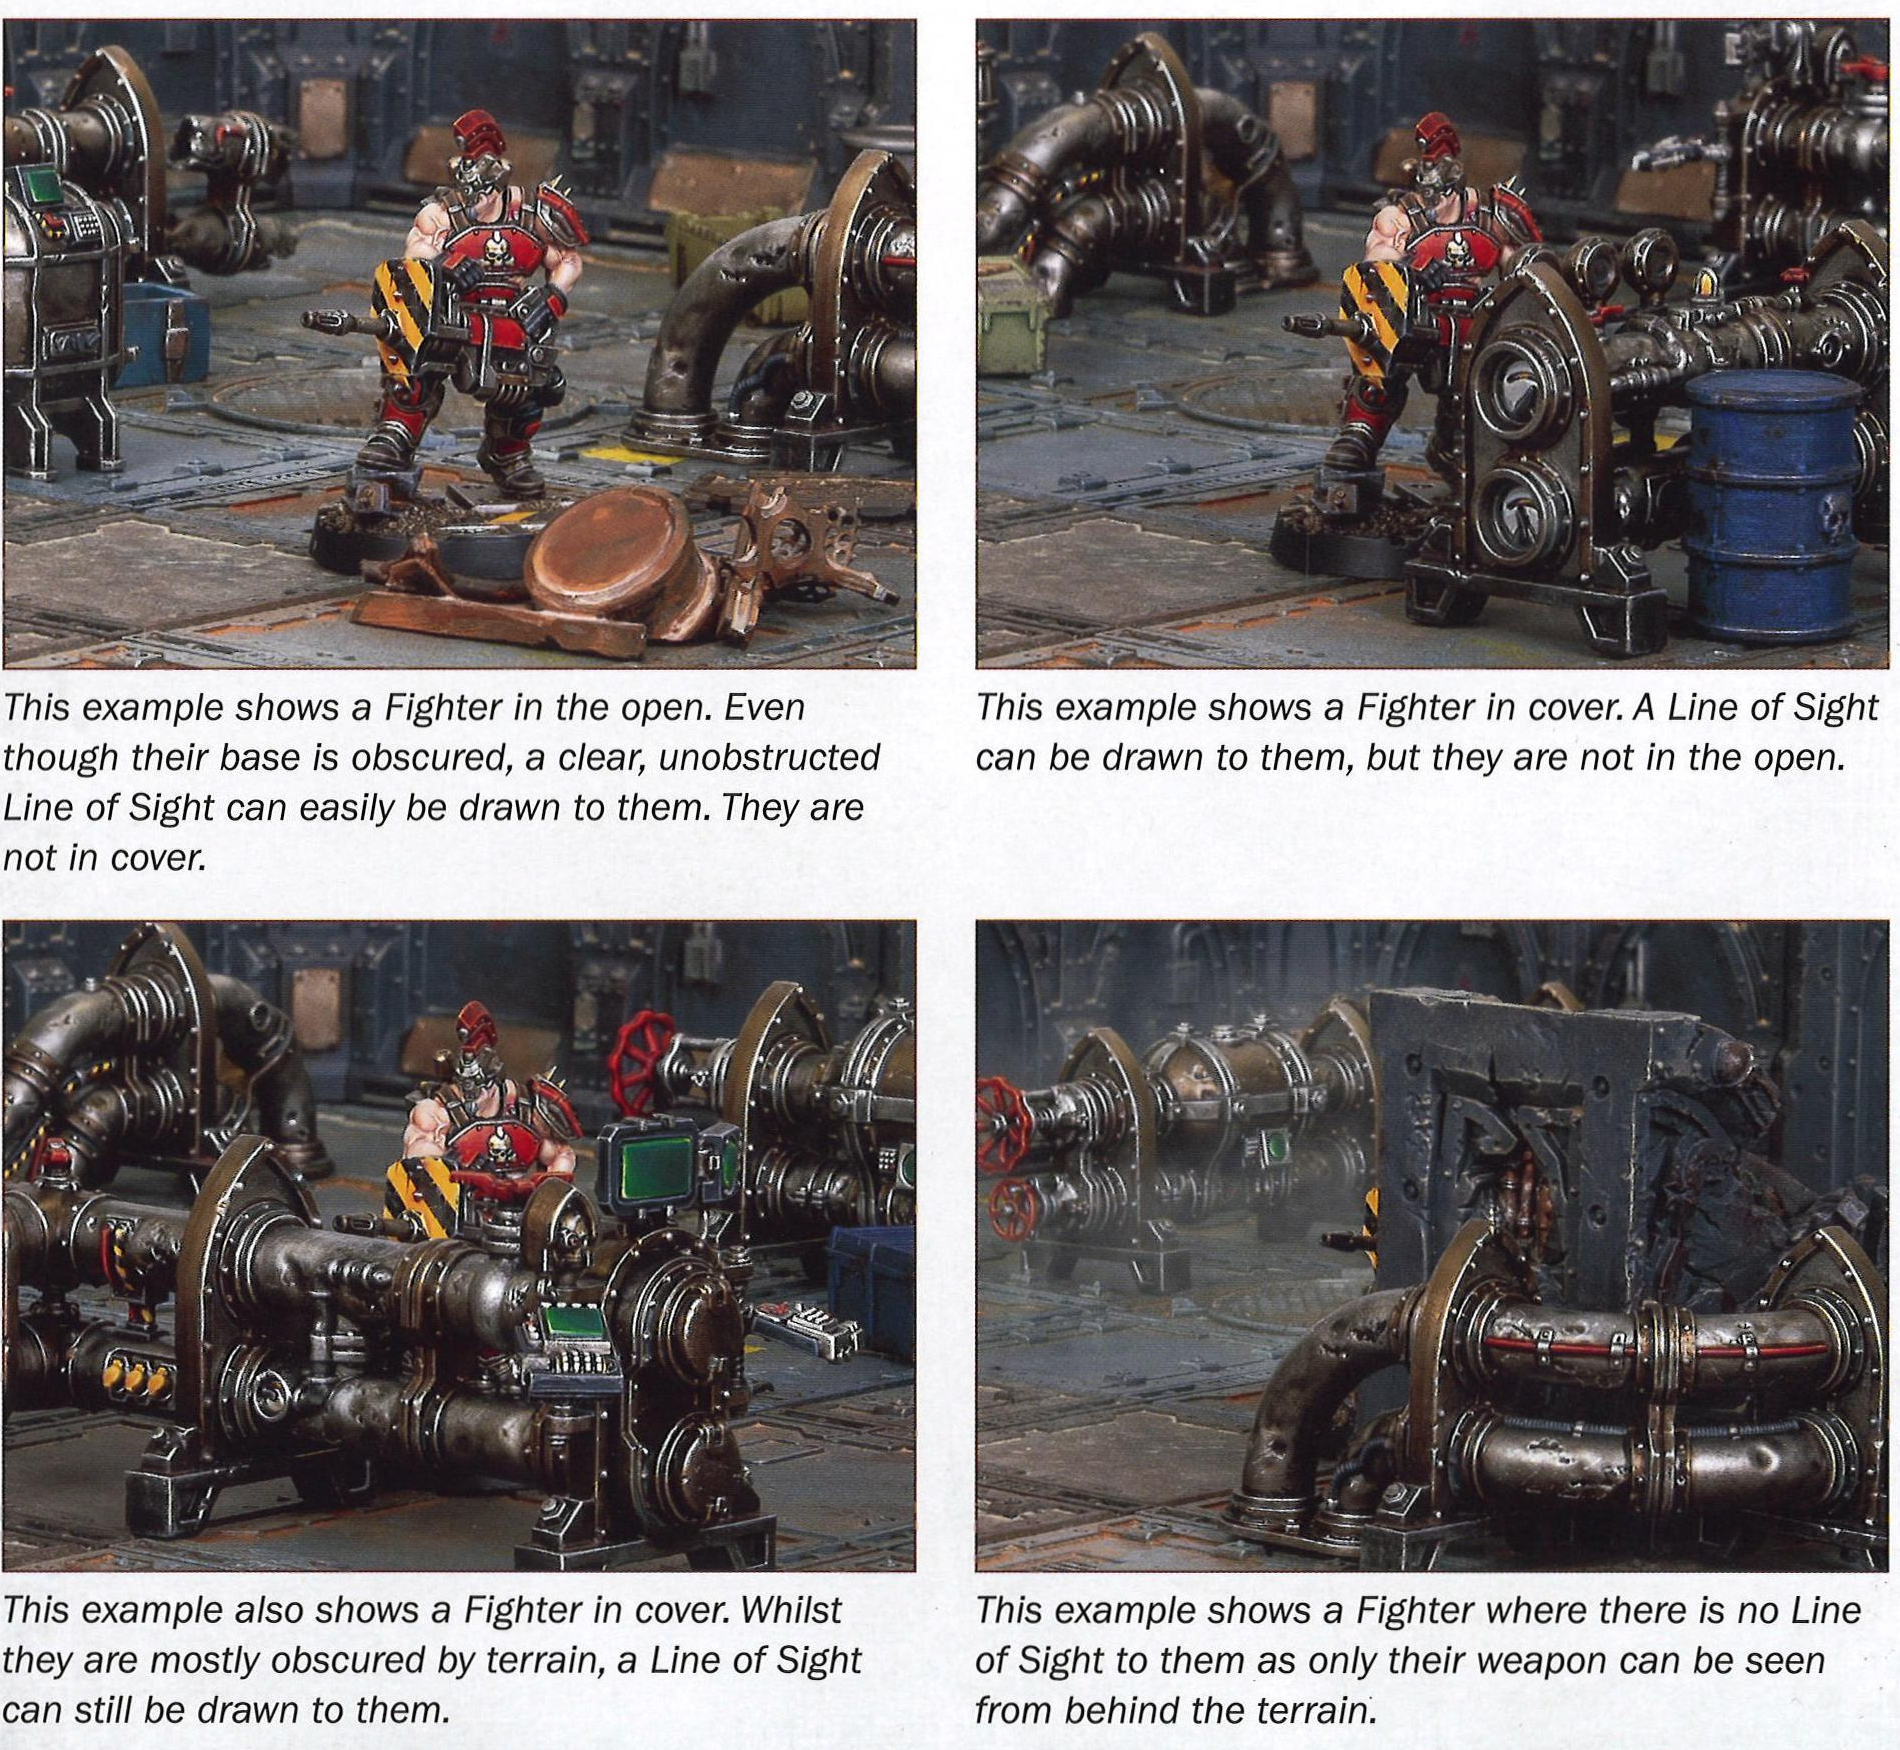
This example shows a Fighter in the open. Even though their base is obscured, a clear, unobstructed Line of Sight can easily be drawn to them. They are not in cover.
This example a/so shows a Fighter in cover. Whilst they are mostly obscured by terrain, a Line of Sight can still be drawn to them.
This example shows a Fighter in cover. A Line of Sight can be drawn to them, but they are not in the open.
This example shows a Fighter where there is no Line of Sight to them as only their weapon can be seen from behind the terreir:
PDF page 39 / Printed page 37
### TERRAIN
Terrain plays a vitally important role in Necromunda. Not only does it provide a dense and challenging battlefield for gangs to fight over, but it also instils battles with the character of the world in which those gangs exist; whether that is the desolate ash wastes, the terrifying Underhells of Hive Secundus or the buried toxic domes of the underhive. How terrain can impact the game and the rules governing specific terrain features will be presented elsewhere within this book (see pages 67-69). There are, however, a few features that should be dealt with here as general principles.
### AGREEING ON TERRAIN TYPES
After players have finished setting up the battlefield, it is worth going through each piece of terrain on the battlefield and agreeing what they all count as to avoid confusion during the battle.
Impassable Terrain: Any terrain can be designated impassable when setting up the battlefield, regardless of size. Impassable terrain may include solid sections of wall, vertiginous rock formations or towering vats of molten metal. Impassable terrain cannot, as the name suggests, be moved through or over.
Difficult or Dangerous Terrain: Difficult and dangerous terrain ranges from acidic pools of sludge to debris strewn floors. Any terrain can be designated as difficult or dangerous when setting up the battlefield, regardless of size. Difficult or dangerous terrain, as the names suggest, is difficult to move over and can even be deadly to those traversing it (see page 67).
Walls: Walls are almost always considered impassable terrain. On a battlefield of only one level, it is assumed that at the top of each wall sits a ceiling, preventing Fighters from climbing over a wall. However, on a battlefield that covers multiple levels, featuring ladders, staircases and even lifts, it is possible for Fighters to scale and climb over walls.
Doors: These come in various sizes, but their rules are the same regardless of size - they are set up as part of the Pre-battle Sequence (see page 140). By default, all doors are closed at the start of a battle, unless a scenario specifies otherwise. Closed doors are considered impassable terrain. They cannot be moved through and block both Line of Sight and measurement in the same way as walls and solid terrain as described previously.
Any Fighter may open a closed door or close an open door within 1" of them by sacrificing 2" of their Movement during their activation.
Closed doors can be targeted by attacks and are automatically hit. All doors have a Toughness of
5. If a door is wounded four times, it is destroyed (do not roll Injury dice for doors) and removed from the battlefield.
Obstacles & Structures: Obstacles are any freestanding terrain features measuring no more than 2" high and no more than 2" across, such as barricades, barrels and pipelines.
Structures are any terrain features measuring more than 2" high or more than 2" across, be they freestanding or connected to other terrain features in some way. Structures may feature many different levels, platforms and walkways on which models may be placed.
Both obstacles and structures may interrupt Line of Sight and offer cover to models as described previously and in the Shooting rules.
Fighters may climb over obstacles or up onto structures as described in the Movement rules, but players should be aware that movement may be reduced or not possible in some cases. Vehicles are unable to climb over obstacles or up onto structures.
PDF page 40 / Printed page 38
### NECROMUNDA DICE
Necromunda uses several different types of dice to determine the outcome of various actions and events. These are:
D6 The most frequently used dice in Necromunda is a regular six-sided dice, marked 1 to 6. On many Necromunda dice, it is common for the '6' to be replaced by a logo - either that of the game or a specific gang.
D66 In some cases, players will be instructed to roll a D66. To do this, roll two D6, one after the other, counting the first dice as tens and the second dice as units, to give a result between 11 and 66. For example, a roll of 2 then 4 would give a result of 24.
D3 The rules might also call for a D3 to be rolled, but an actual three-sided dice is not necessary. To roll a D3, simply roll a D6 and modify the result by halving it, rounding fractions up.
### FIREPOWER DICE
Unique to Necromunda, a Firepower dice is used when a model makes a ranged attack with a weapon that has the Rapid Fire (X) trait. It is rolled to determine how many shots a rapid fire weapon can make and to see if it runs Out of Ammo.
### SCATTER DICE
This is a six-sided dice, marked with a Hit symbol (a target icon with a small arrow) on two faces and an arrow on each of the other four. The Hit symbol also incorporates a small arrow. This dice is used to determine random directions, and is most often used when firing weapons that have the Blast (3"/5") trait.
### INJURY DICE
Another dice unique to Necromunda, Injury dice are special dice used to determine the severity of the injury a model suffers, ranging from Injured/ Damaged to being taken Out of Action. D6 -
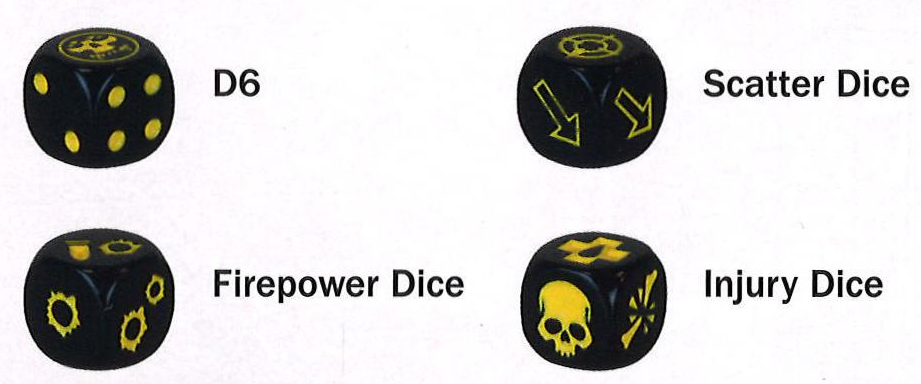
Scatter Dice
Firepower Dice (I
Injury Dice
PDF page 41 / Printed page 39
### ROLLING DICE
A game of Necromunda uses dice rolls a great deal. The roll of a dice determines many things, be it a model's ability to keep their cool in the heat of battle, or the effectiveness of a shot fired from a lasgun. Throughout the rules, players will encounter certain terms that relate to the rolling of dice.
### SINGLE DICE ROLLS
The rules will often require a player to roll a single dice, in which case the rules will state 'roll a D6'. This is a single dice roll. Sometimes, the rules might require several single dice to be rolled at once. For example, 'roll three D6' means three dice are rolled together, but the result of each dice is considered separately. These are also single dice rolls.
### MULTIPLE DICE ROLLS
Often the rules will require a player to roll multiple D6 and add the results together. For example, the rules might instruct a player to 'roll 2D6'. In such cases, two D6 are rolled and the results added together to give a total between 2 and 12. This is a multiple dice roll.
### DICE POOLS
Sometimes, the game may require two or more dice to be rolled and a single result selected for example, a player might roll two or three Injury dice and select one result to apply. In this case a pool of dice has been rolled.
### TESTS
Often, when making a single dice roll or a multiple dice roll, a player needs to roll a specific number or higher. The rules refer to this as a 'test', which is shown as a number followed by a '+'. Making a test is simple. If a player is required to roll a 4+ on a single D6, a roll of 4, 5 or 6 would be a success, but a roll of 1, 2 or 3 would not.
### CHECKS
Sometimes, when making a single dice roll or a multiple dice roll, a player needs to roll equal to or under a specific number. The rules refer to this as a 'check', which is shown as a number. Making a check is simple. If a player is required to roll equal to or under a 3 on a single D6, a roll of 1, 2 or 3 would be a success, but a roll of 4, 5 or 6 would not be.
### MODIFYING DICE ROLLS
The rules will often call for a dice roll to be modified, particularly when making a test. To do this, simply roll the dice and then add or subtract the modifier(s) shown, effectively changing the outcome of the dice roll. If the rules ever require a player to divide a dice roll in any way, any fractions should be rounded up, unless the rules state otherwise.
If a +1 modifier is applied to a test, add it to the dice result; if it is applied to a check, add it to the target number. As a rule of thumb, positive modifiers make it more likely for the test or check to pass, negative modifiers less likely.
If both positive and negative modifiers are applied to a dice roll, apply all positive modifiers first, then apply all negative modifiers.
### ROLLING OFF
The rules may call for both players to roll a dice (usually a D6). Occasionally, a characteristic of some sort will be added to the result. This is called 'rolling off' and the highest score always wins a roll-off. In the case of a tie, roll again unless otherwise instructed.
### NATURAL ROLLS
A 'natural' roll is the actual number rolled on a dice, regardless of modifiers (including the halving of the result rolled on a D6 when rolling it as a D3). It is not uncommon for a natural roll to grant a bonus or a penalty, or to grant an automatic success or cause an automatic failure, regardless of any modifiers that might apply to the dice roll.
### RE-ROLLS
When rolling dice, it is common for things to go wrong! However, occasionally there are special rules that allow for certain dice rolls to be re-rolled, in which case:
- The second result must always be accepted, even if it is worse than the original result.
- A dice can never be re-rolled more than once, regardless of the source of the re-roll.
PDF page 42 / Printed page 40
### MODEL STATUS
A model's Status dictates what they can or cannot do. The actions a model can perform during their activation will depend heavily upon their current Status, which can change through the course of a game. This is generally represented by how the model is positioned on the battlefield and tokens placed either next to them on the battlefield or on their Model Card (see page 53), whether they are Active, Engaged, Suppressed or Seriously Injured/Damaged, as described below, but may also depend upon other factors.
### ACTIVE
A model is Active if they are not currently Engaged with any enemy models, Suppressed or Seriously Injured/Damaged. Active is the default Status for a model and such models enjoy the greatest freedom to perform actions.
### ENGAGED
In order for models to make close combat attacks, they must be Engaged with an enemy model:
- If the base of a Fighter is touching the base of an enemy Fighter, they are said to be in base to base contact and are Engaged with that enemy Fighter unless either Fighter is Seriously Injured.
- If the base of a Fighter is within 1" of any part of an enemy Vehicle at the start of their activation, they may choose to be Engaged with that Vehicle, unless either model is Seriously Injured/Damaged.
- If any part of a Vehicle is within 1" of any part of an enemy model at the start of its activation, it may choose to be Engaged with that model, unless either model is Seriously Injured/Damaged.
- At all other times, models are not considered to be Engaged with enemy Vehicles and vice versa.
An Engaged model can generally only choose actions that allow them to fight or retreat, but other factors may increase the number of available options.
### SERIOUSLY INJURED/DAMAGED
If a model should suffer a 'Serious Injury' result on an Injury dice, they will become Seriously Injured if they are a Fighter, or Seriously Damaged if they are a Vehicle. A model is very vulnerable whilst this is their Status, being susceptible to enemy attacks against which they cannot defend themselves and being unable to move quickly towards safety.
If a Seriously Injured/Damaged model regains a Wound, change their Status to Active; if this happens while they are within 1" of an enemy model, they are instead taken Out of Action.
A model that is Seriously Injured/Damaged has a Seriously Injured marker placed next to them.
### SUPPRESSED
Models generally become Suppressed as a result of being hit by enemy fire, and may perform one less action during their activation. If a Suppressed model ever becomes Engaged by an enemy model, they will immediately change their Status to Engaged. A model can never be both Suppressed and Engaged.
A model that is Suppressed has a Suppressed marker placed next to them, representing the model keeping their head down to avoid enemy fire. This marker is removed at the end of their next activation.
### MULTIPLE STATUSES
A model may only ever have one Status at a time. When multiple Statuses would apply to a model, apply them in the following priority order:
1. Seriously Injured/Damaged
2. Engaged
3. Suppressed
4. Active
PDF page 43 / Printed page 41
### SHOWING CONDITIONS & STATUSES
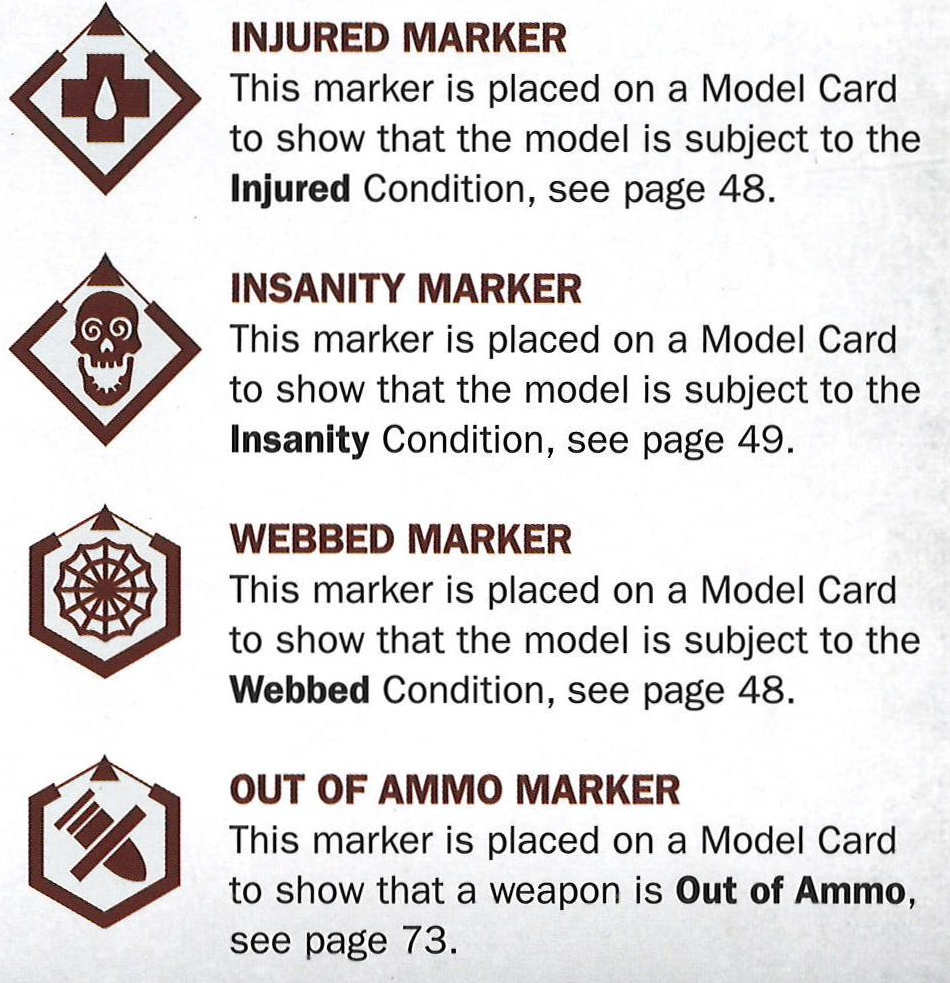
There are a variety of Conditions and Statuses that can be applied to models during play, which can be indicated either by placing markers next to models or on their Model Cards.
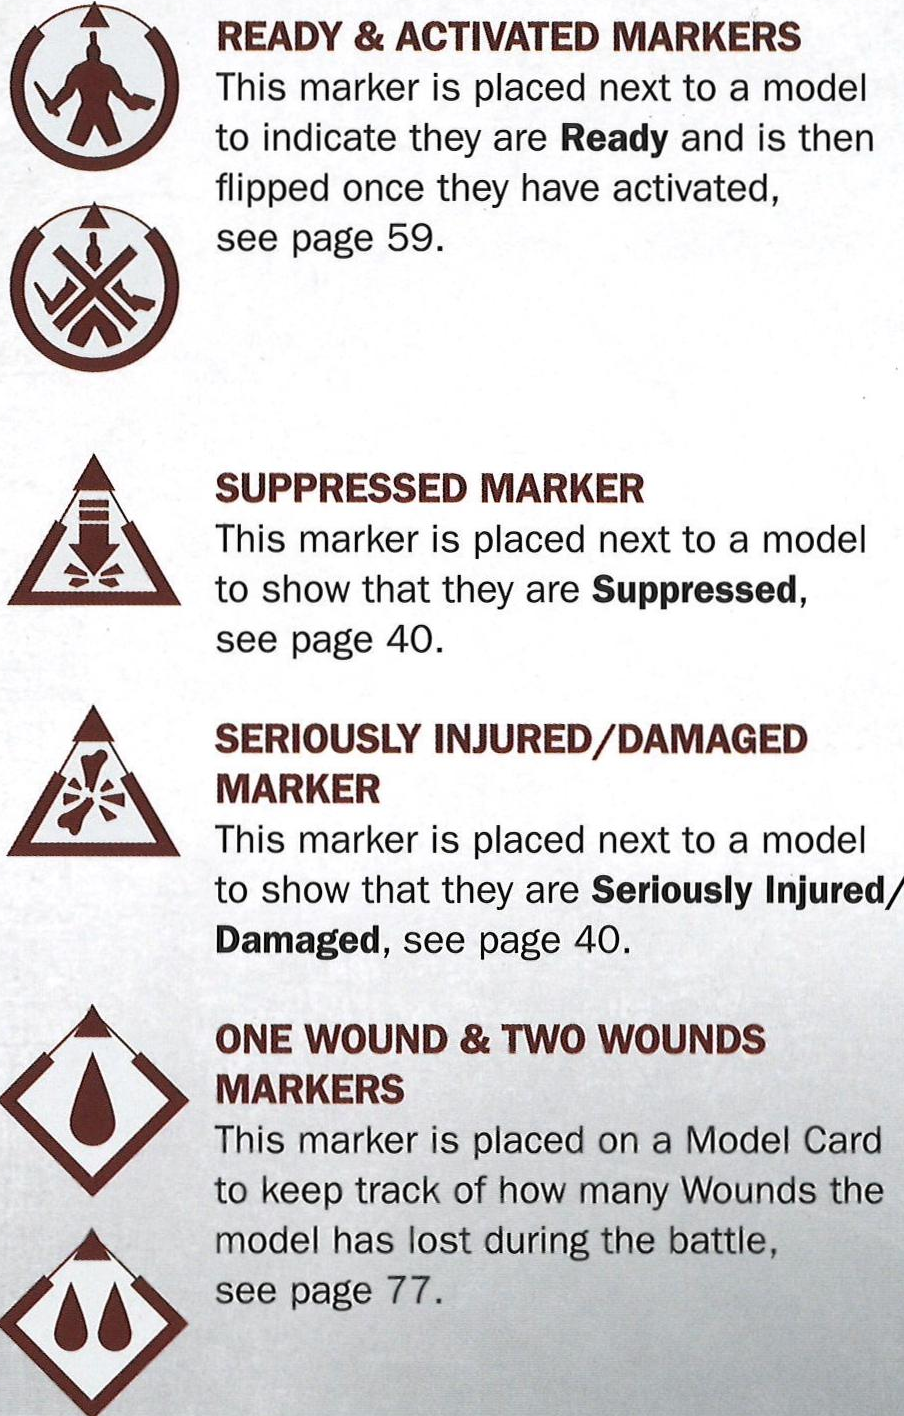
### READY & ACTIVATED MARKERS
### INJURED MARKER
This marker is placed next to a model
This marker is placed on a Model Card to indicate they are Ready and is then to show that the model is subject to the flipped once they have activated,
Injured Condition, see page 48.
see page 59.
### INSANITY MARKER
This marker is placed on a Model Card to show that the model is subject to the Insanity Condition, see page 49.
### SUPPRESSED MARKER
This marker is placed next to a model
### WEBBED MARKER
to show that they are Suppressed,
This marker is placed on a Model Card to show that the model is subject to the see page 40.
Webbed Condition, see page 48.
### SERIOUSLY INJURED/DAMAGED
### MARKER
### OUT OF AMMO MARKER
This marker is placed next to a model
This marker is placed on a Model Card to show that they are Seriously Injured/ to show that a weapon is Out of Ammo,
Damaged, see page 40.
see page 73.
### ONE WOUND & TWO WOUNDS
### ARBITRATOR'S TOOLKIT:
### MARKERS
### LAYING FIGHTERS DOWN
This marker is placed on a Model Card
Some veteran players may remember earlier to keep track of how many Wounds the editions of Necromunda where Fighters were model has lost during the battle, laid down on the battlefield to show their see page 77.
Status. This has been changed in this edition due to difficulty with some models in laying them on their front or back. However, if players wish, they may represent the Suppressed Status by laying the model on their back, and the Seriously Injured Status by placing the model on their front.
PDF page 45 / Printed page 43
### MODEL TYPES
Every model has a Type and at least one Subtype. These are detailed as follows and affect many aspects of the model, including which Post-cycle Actions they can perform.
### REFERENCING MODEL TYPES
When referring to specific models, instead of saying 'models with the Fighter Type' or 'models with the Beast Subtype' the rules will usually just say 'Fighters' or 'Beasts'. If a Type or Subtype is referenced in the rules, it means any model with that Type or Subtype.
### FIGHTER
Models with the Fighter Type are the backbone of gangs, their footsoldiers and leaders. The majority of models in a Necromunda gang will be Fighters.
### VEHICLE
Vehicles are far more restricted than Fighters with regard to the actions they can perform during a battle and the Post-cycle Sequence; however, they give gangs access to powerful weaponry upon a fast chassis. Vehicles and their crew are inseparable and when the rules refer to Vehicles, they can refer to either the Vehicle itself or its crew.
When a Vehicle is removed from the Gang Roster, all weapons and wargear it is equipped with are deleted instead of going into the gang's Stash.
All Vehicles have the Juggernaut skill (see page 153).
PDF page 46 / Printed page 44
### FIGHTER SUBTYPES
All Fighters have a Subtype that dictates their position within a gang and which Post-cycle Actions they may perform (see pages 88-89). Fighters may also have multiple different Subtypes applied to them. For example, a Cawdor Sheen Bird is a Fighter (Beast, Flying, Pet), meaning that they are a Fighter that is subject to the rules of the Beast, Flying and Pet Subtypes.
### BEAST
A Beast is an animal that can only perform limited actions. Unless stated otherwise, a Beast may not perform the following actions:
- Interact
- Treat Ally
Additionally, a Beast may not assist a model making a Recovery test and a gang cannot use the Leadership characteristic of a Beast for Bottle checks unless every friendly model on the battlefield is a Beast.
### BRUTE
All Brutes have the Juggernaut skill (see page 153). When a Brute is removed from the Gang Roster, all weapons and wargear they are equipped with are deleted instead of going into the gang's Stash.
### CHAMPION
Friendly models within 6" and in Line of Sight of a Champion may use the Champion's Cool characteristic for Nerve checks.
All Champions have the Inspiring skill (see page 153).
### FLYING
A Flying Fighter may move between levels without needing to climb a wall or ladder by measuring a straight line between their starting and final positions. They may move over terrain and other Fighters in this manner, though they still need to move up and over the terrain. Additionally, whenever they fall, they are not Suppressed and never take any damage. They may not, however, ignore impassable terrain and may not end their movement with their base overlapping an obstacle or another Fighter's base.
### GANGER
If during the Post-cycle Sequence a Ganger should reach at least 37 XP, they are promoted to a Champion. After rolling to determine an Advancement, they replace the Ganger Subtype with the Champion Subtype, keeping all their other existing Subtypes. From that point onwards they are treated as a Champion of the appropriate gang. This does not cause them to change their Fighter entryif an Escher Gang Sister becomes promoted to a Champion she remains an Escher Gang Sister, she does not become an Escher Death Maiden or Escher Matriarch.
### HANGER-ON
When selecting a gang's starting crew and creating their Reinforcements deck, Hangers-on may be excluded from being randomly selected. When a Hanger-on is removed from the Gang Roster, all weapons and wargear they are equipped with are deleted instead of going into the gang's Stash.
### LEADER
One Fighter in every gang must always have the Leader Subtype; if they die, another Fighter is promoted to replace them (see Death of a Leader on page 98). Friendly models within 12" and in Line of Sight of a Leader may use the Leader's Cool Characteristic for Nerve checks.
All Leaders have the Inspiring skill (see page 153).
### LONER
A gang cannot use the Leadership characteristic of a Loner for Bottle checks unless every friendly model on the battlefield is either a Beast or a Loner.
PDF page 47 / Printed page 45
### MOUNTED
Many items of wargear grant a Fighter the Mounted Subtype. The following rules apply to Mounted Fighters:
Optional Equipment: When determining which models are available for a scenario, the controlling player may decide if any Fighter with wargear that grants the Mounted Subtype will use that wargear during the battle. This decision is made for all Fighters before determining starting crews and cannot be changed mid-battle. Fighters cannot get off their mounts nor get on another model's mount during a battle.
Skills: In addition to their normal skills, all Mounted Fighters gain the Nerves of Steel and Hit & Run skills.
Mounted Fighters and Terrain: Mounted Fighters cannot climb up nor down walls or ladders. They can still attempt to jump down to lower levels or jump gaps as normal.
Gun It: When a Mounted Fighter performs a Charge or Dash action, they may only make one 90° turn during the action.
Agile Subtype: Some mounts will grant the Fighter the Agile Subtype as well as the Mounted Subtype. Mounted Fighters with the Agile Subtype can make as many turns as they wish while performing a Charge or Dash action.
Hands Full: A Mounted Fighter cannot be equipped with any weapon that has the Heavy or Paired trait unless it also has the Lance or Lance-bomb trait, though such weapons may be included on the Fighter's Model Cards that do not include the mount as part of their equipment. Additionally, a Mounted Fighter may not use a Secondary weapon in close combat.
### PET
Pets are purchased as wargear for a model and as such their Credits Value is included on the owning model's Model Card. Pets are automatically included in a gang's starting crew if their owner is and do not count against the crew or reinforcement limits. When their owner is deployed to the battlefield, including as part of a special rule, any Pets they own are deployed following the rules for the model's deployment within their Leash range of their owner.
When a model that owns any Pets activates, check if each of their Pets are outside of their Leash range; any that are will become Panicked. The model and their Pets then activate in an order of the controlling player's choice, each model fully resolving their activation before the next one activates.
When a model goes Out of Action or is removed from the Battlefield for any reason, any Pets they have on the battlefield are also removed.
When a Pet is taken Out of Action, they do not trigger a Bottle check nor do they force nearby models to make a Nerve check, though they do have to take Nerve checks if other models are taken Out of Action near them.
Pets cannot control objectives, though they do prevent enemy Fighters from controlling them.
### PANICKED
When a Pet that is Panicked activates, depending on their Status they must perform the action dictated by the table below. They perform this action even if another rule or Condition would cause them to perform a different action (for example, the Insanity or Frenzy Conditions):
| Status | Action |
| --- | --- |
| Ready | Dash |
| Suppressed | Move |
| Seriously Injured | Crawl |
| Engaged | Retreat |
They must attempt to end their activation within Leash Range of their owner. If they are unable to do so, they must end their activation as close as possible to their owner.
PDF page 48 / Printed page 46
### PROSPECT
When a Prospect is taken Out of Action, friendly models only need to make Nerve checks if they themselves are also Prospects, though they do have to take Nerve checks if other models are taken Out of Action near them.
If, during the Post-cycle Sequence, a Prospect should reach at least 13 XP, they are promoted to become a Ganger. Instead of rolling to determine an Advancement, they replace the Prospect Subtype with the Ganger Subtype and gain the Specialist Subtype (this means they then immediately select a specialisation and gain the associated skill), keeping all of their existing Subtypes and increasing their Credit Cost by +15 credits. From that point onwards they are treated as a Ganger of the appropriate gang. This does not cause them to change their Fighter entry - if a Van Saar Subtek becomes promoted to a Ganger they remain a Van Saar Subtek, they do not become a Van Saar Tek.
### SPECIALIST
When a Specialist is added to the Gang Roster, they must select one of the following specialisations. Each specialisation grants the Fighter a free skill:
| Specialist Type | Free Skill |
| --- | --- |
| Heavy | Bulging Biceps |
| Gunner | Hip-shooting |
| Gunslinger | Gunfighter |
| Scout | Clamber |
| Sniper | Precision Shot |
| Brawler | Berserker |
| Medic | Medicate |
| Tech | Munitioneer |
### SUPPORT
A Support Fighter can always be included in a gang's starting crew, does not count against the crew limit and can never be targeted with a ranged attack unless they are the closest model.
### WYRD
A Wyrd may use Wyrd Powers as described on page 82.
Wyrds treat the Wyrd Powers on page 85 as a Secondary Skill Set.
PDF page 49 / Printed page 47
### VEHICLE SUBTYPES
All Vehicles have a Subtype based on their method of Locomotion that affects how they interact with both difficult and dangerous terrain. Vehicles may also have multiple different Subtypes applied to them. For example, a Van Saar 'Arachni-Rig' Servo- Suit has the Loner and Walker Subtypes.
### HYBRID
A Vehicle with this Subtype uses a mix of methods for Locomotion; it may choose which of its Locomotion Subtypes to use when activating.
### LONER
A gang cannot use the Leadership characteristics of a Loner for Bottle checks unless every friendly model on the battlefield is either a Beast or a Loner.
### MANOEUVRABLE
A Vehicle with this Subtype may perform one additional 90° turn when performing the Charge or Dash action.
### SKIMMER
A Vehicle with the Skimmer Locomotion Subtype ignores all difficult or dangerous terrain when moving. However, if it ends its activation on difficult or dangerous terrain, a Skimmer must make an Agility test (see page 67). If the test is passed, it has successfully negotiated the terrain. If it is failed, it suffers a Str -, AP-, L1 Hit that automatically Wounds and ignores all saves.
### TRACKED
A Vehicle with the Tracked Locomotion Subtype is designed to keep going over all terrain - though they struggle to reach high speeds. A Tracked Vehicle suffers no penalty for moving over difficult terrain.
### TRANSPORT (X)
A Vehicle with the Transport (X) Subtype has an enclosed cab on the Vehicle that is designed to carry Fighters. All Transports must have at least one clearly visible access point.
The number of Fighters able to fit in a Transport is determined by the value of X. This is the maximum number of Fighters that can embark upon the Vehicle. When deploying at the start of a battle, Fighters can be deployed embarked upon a Transport as long as the Vehicle is already deployed upon the battlefield; Fighters cannot start embarked upon a Vehicle that is in Reinforcements (note: Brutes and Mounted Fighters cannot enter a Transport).
While embarked on a Transport, Fighters are still given Ready markers but in all other ways are treated as if they are not on the battlefield, so cannot be the target of any attacks or use any abilities. If any Fighters are embarked on a Vehicle when it is taken Out of Action, they must be placed Suppressed within 1" of the Vehicle before resolving any explosion (if applicable). Any Fighter that cannot be placed in this way is automatically taken Out of Action - immediately make a roll on the Lasting Injury table for them.
If a Fighter performs the Interact action while within 1" of the access point of a friendly Transport, remove them from the battlefield. They are now embarked upon the Transport.
While embarked upon a Transport, the only action a Fighter may perform is the Interact action. If a Fighter performs the Interact action while embarked upon a Transport, place them on the battlefield within 1" of an access point and at least 1" away from any enemy models. This may mean that Fighters cannot disembark from a Transport, in which case they cannot perform the Interact action that activation.
### WALKER
Vehicles with the Walker Locomotion Subtype are highly manoeuvrable and agile, but lack the speed of other Vehicles. A Walker may make as many turns during its activation as it wishes. For every 1" of difficult terrain a Walker moves through, it counts as having moved 2".
Additionally, Walkers are treated as if they were Fighters for the purpose of seeing if a model is Engaged (see page 40). This means that enemy Fighters in base contact with a Walker are considered to be Engaged with it, may not treat it as terrain and must obey the 1" rule with it.
### WHEELED
Vehicles with the Wheeled Locomotion Subtype are able to reach high speeds but struggle to maintain their speed over rough terrain. For every 1" of difficult terrain a Wheeled Vehicle moves through, it counts as having moved 2".
PDF page 50 / Printed page 48
### CONDITIONS
A model's Status is always either Active, Engaged, Suppressed or Seriously Injured/Damaged, but they may also be subject to one or more of the following Conditions. Conditions are denoted by placing a Condition marker either next to the model on the battlefield or on their Model Card as a reminder that the Condition is in effect.
The following list of Conditions is not exhaustive. Some Conditions are common and will apply to a model many times during a battle. Others are less common and may be the result of an attack from a weapon with a certain trait; the full rules for such Conditions can be found in the corresponding Weapon Trait rules. Other Conditions, in particular Out of Ammo, may apply specifically to a weapon the model carries rather than the model themselves. A model may be subject to several Conditions at the same time.
### FEARSOME
If a model subject to the Fearsome Condition is selected as the target of close combat attacks, the attacking model must immediately make a Willpower check. If the check is passed there is no effect; however, if the check is failed, then until the current model's activation ends, set the attacking model's WS to 6+.
Models that are subject to the Fearsome Condition are themselves not affected by this Condition, unless the enemy model also has the Terrifying Condition.
### FRENZY
An Active model subject to the Frenzy Condition must declare a Charge action if they begin their activation within their Movement characteristic +6" of an enemy model and they are able to complete that Charge. This Charge action must move directly towards the nearest enemy model. While subject to the Frenzy Condition, a model increases their Attacks characteristic by 1.
### HATRED (X)
When a model subject to the Hatred {X) Condition either performs or is the target of a Charge or Engage action against a model they hate, they may re-roll any failed Hit rolls in close combat for the duration of the current model's activation.
Which enemies are hated varies from model to model and will be shown in brackets after the name of this Condition (shown here as 'X').
### INJURED/DAMAGED
When a model is reduced to zero Wounds they become subject to the Injured Condition if they are a Fighter, or the Damaged Condition if they are a Vehicle. An Injured/Damaged model gains no benefit from any of their skills, in effect they act as if they do not have any skills. If an Injured/Damaged model regains a Wound, then they lose the Injured/ Damaged Condition.
### INTOXICATED
While a model is subject to the Intoxicated Condition, they reduce their BS and WS characteristics by 1 to a minimum of 6+, but increase their Cool characteristic by 1 (to a maximum of 10).
### TERRIFYING
Models that are subject to the Terrifying Condition gain all the benefits of the Fearsome Condition. In addition, if an enemy model wishes to perform a Charge or Engage action targeting a model that is subject to the Terrifying Condition, they must make a Willpower check. If this check is passed then they may perform the action as normal; however, if the check is failed then they must remain where they are and their activation ends.
Models that are subject to the Terrifying Condition are themselves not affected by either the Fearsome or Terrifying Conditions.
### WEBBED
While a model is subject to the Webbed Condition, they are unable to move (either voluntarily or involuntarily) and suffer a -1 penalty to all Hit rolls. At the end of a Webbed model's activation, they make a Strength check. If the check is passed, they break free and lose the Webbed Condition.
PDF page 51 / Printed page 49
### INSANITY
When a model subject to the Insanity Condition activates, roll a D6 on the Insanity table to see what action they perform. The model's controlling player decides how the model will perform the action following the guidelines laid out in the table; once the model has completed the action(s), their activation ends and they make a Willpower check. If the check is passed, they shake off the madness and lose the Insanity Condition (note: a model subject to the Insanity Condition will perform the actions shown in the Insanity table even if they are Suppressed, and this may result in them performing more or fewer actions than would normally be allowed).
### INSANITY TABLE
D6 1 "You'll never take me alive!"
2 "The Floor Is
Unengaged Model Action Charge the nearest model (friend or foe).
Dash, ending the move as
Engaged Model Action Fight randomly, targeting a model they are Engaged with.
Retreat, ending the move
Seriously Injured Model Action Crawl directly towards the closest model (friend or foe), making sure they end the action at least 1" away from all models. Crawl, ending the move as high above ground level as as high above ground level high above ground level as covered In Spiders!"
3 "They're coming for me!"
4 "The Shadows have eyes!"
5 "I'll get you!"
6 "Hide!" they can.
Dash, ending the move as far from all models (both friend and foe) as they can. Dash, ending the move as far from all terrain features and obstacles as they can.
Shoot or Braced Shot, targeting the closest model (friend or foe); if the closest model is not in Line of Sight or range, they perform a Move action first, attempting to bring the closest model into Line of Sight and range.
If the model has no ranged weapon equipped, treat this result as "You'll never take me alive!" instead. Dash, attempting to end the move out of Line of Sight of all other models (friend or foe).
as they can.
Retreat, ending the move as far from all models (both friend and foe) as they can. Retreat, ending the move as far from all terrain features and obstacles as they can.
Retreat and then perform a Shoot or Braced Shot, targeting the closest model (friend or foe).
If the model has no ranged weapon equipped, treat this result as "You'll never take me alive!" instead.
Retreat, moving directly away from the model they are Engaged with.
they can and at least 1" away from all models. Crawl, ending the move as far from all models (both friend and foe) as they can. Crawl, ending the move as far from all terrain features and obstacles as they can and at least 1" away from all models. Crawl directly towards the closest model (friend or foe), making sure they end the action at least 1" away from all models.
Crawl, attempting to end the move out of Line of Sight of all other models (friend or foe) and at least 1" away from all models.
PDF page 52 / Printed page 50
### GANG FIGHTERS & THEIR WEAPONRY
In Necromunda, each player controls a 'gang', which is made up of a number of models. Each of these models is referred to as a 'Fighter' or a 'Vehicle' within the rules. Each model has a Type (either Fighter or Vehicle) and one or more Subtypes such as Beast, Flying, Leader, Specialist, etc.
### MODEL CHARACTERISTICS PROFILES
Each model has a 'characteristics profile', which details their capabilities in battle. For example, here is the profile for an Escher Gang Sister:
### ESCHER GANG SISTER
| M | WS | BS | S | T | W | I | A | Sv |
| --- | --- | --- | --- | --- | --- | --- | --- | --- |
| 5" | 4+ | 4+ | 3 | 3 | 1 | 4 | 1 | 6+ |
| Ld | Cl | Wil | Int | Type | Current/Target XP |
| --- | --- | --- | --- | --- | --- |
| 6 | 6 | 6 | 6 | Fighter (Ganger, Specialist) | 13/19 |
Each of these characteristics represents a different trait or attribute, and each characteristic is used differently within the game. In some cases a low number is better, but in other cases, a high number is better:
- Movement (M), Strength (S), Toughness (T), Wounds (W), Initiative (I) and Attacks (A) are all shown as simple numbers, in which case a higher number is better.
- Weapon Skill (WS), Ballistic Skill (BS) and Save (Sv) are all shown as target numbers; a number followed by a '+' symbol, in which case a lower number is better.
- In addition, all four of a model's psychology characteristics: Leadership (Ld), Cool (Cl), Willpower (Wil) and Intelligence (Int), are also all shown as simple numbers. In the case of all four psychology characteristics, a higher number is better.
- Finally, Type and Subtype as described on page 43, and Current/Target XP is used in Campaign play as described on page 90.
During campaigns, characteristics may be improved or reduced as models gain experience and suffer injuries. No characteristic may ever be improved beyond the maximum shown on the table below. No characteristic may ever be reduced below the minimum shown on the table below:
| Characteristic | M | WS | BS | S | T | W | I | A | Sv | Ld | Cl | Wil | Int |
| --- | --- | --- | --- | --- | --- | --- | --- | --- | --- | --- | --- | --- | --- |
| Maximum | 12" | 2+ | 2+ | 10 | 10 | 10 | 10 | 10 | 3+ | 10 | 10 | 10 | 10 |
| Minimum | 1" | 6+ | 6+ | 1 | 1 | 0 | 1 | 1 | 6+ | 4 | 4 | 4 | 4 |
PDF page 53 / Printed page 51
### MODEL CHARACTERISTICS & TESTS/CHECKS
A model's characteristics are defined as follows:
### MOVEMENT (M)
This is the distance, in inches, the model can move when making a standard Move action.
### WEAPON SKILL (WS)
This shows the model's proficiency when using weapons in close combat.
### BALLISTIC SKILL (BS)
This characteristic represents the model's proficiency with ranged weapons.
### STRENGTH (S)
This is how strong the model is. The higher a model's Strength characteristic, the more likely they are to inflict damage on an opponent in close combat.
### TOUGHNESS (T)
This represents how tough the model is. The higher a model's Toughness characteristic, the less likely they are to be wounded by an attack.
### WOUNDS (W)
A model's Wounds characteristic is a measure of how much punishment they can take before succumbing to their injuries or damage.
### INITIATIVE (I)
A model's Initiative characteristic is a measure of how quickly they act in combat.
### ATTACKS (A)
This is a measure of a model's ferocity in melee. When a model is Engaged in close combat, their Attacks characteristic determines how many dice are rolled, with each dice representing one attack made against their enemies.
### SAVE (SV)
This is a measure of both how well armoured and protected a model is and how well the model can roll with hits and use cover to minimise the damage they take.
### LEADERSHIP (LD)
A model's Leadership characteristic represents their ability to issue or follow commands in the heat of battle.
### COOL (CL)
A model's Cool characteristic represents their capacity for keeping calm under fire.
### WILLPOWER (WIL)
Willpower is a measure of a model's mental fortitude and resilience against the horrors of Necromunda.
### INTELLIGENCE (INT)
This represents a model's mental acuity and ability to apply knowledge.
### CHARACTERISTIC TESTS/CHECKS
Players will often be called on to make a characteristic test or check for a model for example, a Ballistic Skill test is made when a model attacks with a ranged weapon. Characteristic tests and checks are made as follows:
- Weapon Skill and Ballistic Skill tests are made by achieving a target number roll on a single D6 (see page 39). If the result is equal to or higher than the characteristic, the test is passed.
- Leadership, Cool, Willpower and Intelligence checks are made by rolling equal to or under the characteristic on 2D6 (as described on page 39). If the result is equal to or less than the characteristic, the check is passed.
- To check against any other characteristic presented as a simple number, such as Strength or Toughness, roll a D6. If the result is equal to or lower than the characteristic, the check is passed.
### IMPROVING/REDUCING CHARACTERISTICS
Sometimes, the rules will improve or reduce a characteristic, usually as a result of an Advancement or a Lasting Injury. When the characteristic is a simple number, it is just increased or decreased by the appropriate amount - for example, if a model with Strength 3 improves their Strength by +1, their Strength is now 4.
If the characteristic is given as a target number (for example, a characteristic of 4+ means a dice roll of 4 or higher would be a success), then it is improved by lowering the number and reduced by increasing it. For example, if a model with Ballistic Skill 4+ improves their Ballistic Skill by +1, their Ballistic Skill is now 3+.
PDF page 54 / Printed page 52
### WEAPON PROFILES
In the same way as a model, each weapon has its own characteristics profile, detailing the range of its attacks, the lethality of the weapon and so forth. For example, here is the profile of a boltgun:
| Name | SR | LR | Str | AP | L | Traits | Creds | TP |
| --- | --- | --- | --- | --- | --- | --- | --- | --- |
| Boltgun | 12" | 24" | 4 | -1 | 2 | Rapid Fire (1) | 55 | 2 |
A weapon's characteristics are defined as follows:
### SHORT RANGE (SR) & LONG RANGE (LR)
Each weapon has two ranges: Short Range (SR) and Long Range (LR), usually presented as a number of inches. Weapons cannot hit models outside of their Long Range. There may be other effects associated with an attack being within either the Long or Short Range of a weapon; these will be explained when they come up.
Some weapon ranges are shown as a letter or a '-' rather than a number of inches. If a weapon's range is listed as an 'E', it can only be used in close combat against targets that are Engaged with the wielder. If a weapon's range is 'T', it uses the Flame template (see page 73). Weapons with a Range of E or T normally only have a Short Range given, not a Long Range. If a range is denoted by a '-', it means the weapon cannot be used at that range.
### STRENGTH (STR)
This is the weapon's Strength, which is used when making Wound rolls against the target. For most weapons, particularly ranged weapons, this is a simple number. For close combat weapons, this may be shown as 'S', meaning the Strength of the wielder should be used, or an S with a modifier (i.e., S+3), meaning the Strength of the wielder is used but with a modifier applied. If a weapon's . Strength is '-' then its traits will describe how to resolve Hits from it.
### ARMOUR PIERCING (AP)
This shows how good the weapon is at punching through a target's armour. This is a modifier which is applied to the dice rolled to make an Armour save. Most often, this will be a negative modifier, but in some cases it may be a positive modifier or even a '-' which denotes no modifier.
### LETHALITY (L)
This represents how lethal the weapon is. This in turn indicates how many Injury dice are rolled against a target that has been reduced to zero Wounds as a result of the attack. This is explained in more detail on page 77. If a weapon's Lethality is '-' then its traits will describe how to resolve Hits from it.
### TRAITS
Most weapons have one or more traits, each of which gives the weapon a unique bonus or changes the way in which it works. Traits are covered in more detail on page 161.
### CREDIT COST (CREDS)
This indicates how many credits it costs to purchase the weapon from the Trading Post. This is explained in more detail on page 92.
### TRADE POINTS (TP)
This indicates how easily available a weapon is from the Trading Post and how many Trade Points it costs. This is explained in more detail on page 92.
PDF page 55 / Printed page 53
### MODEL CARDS
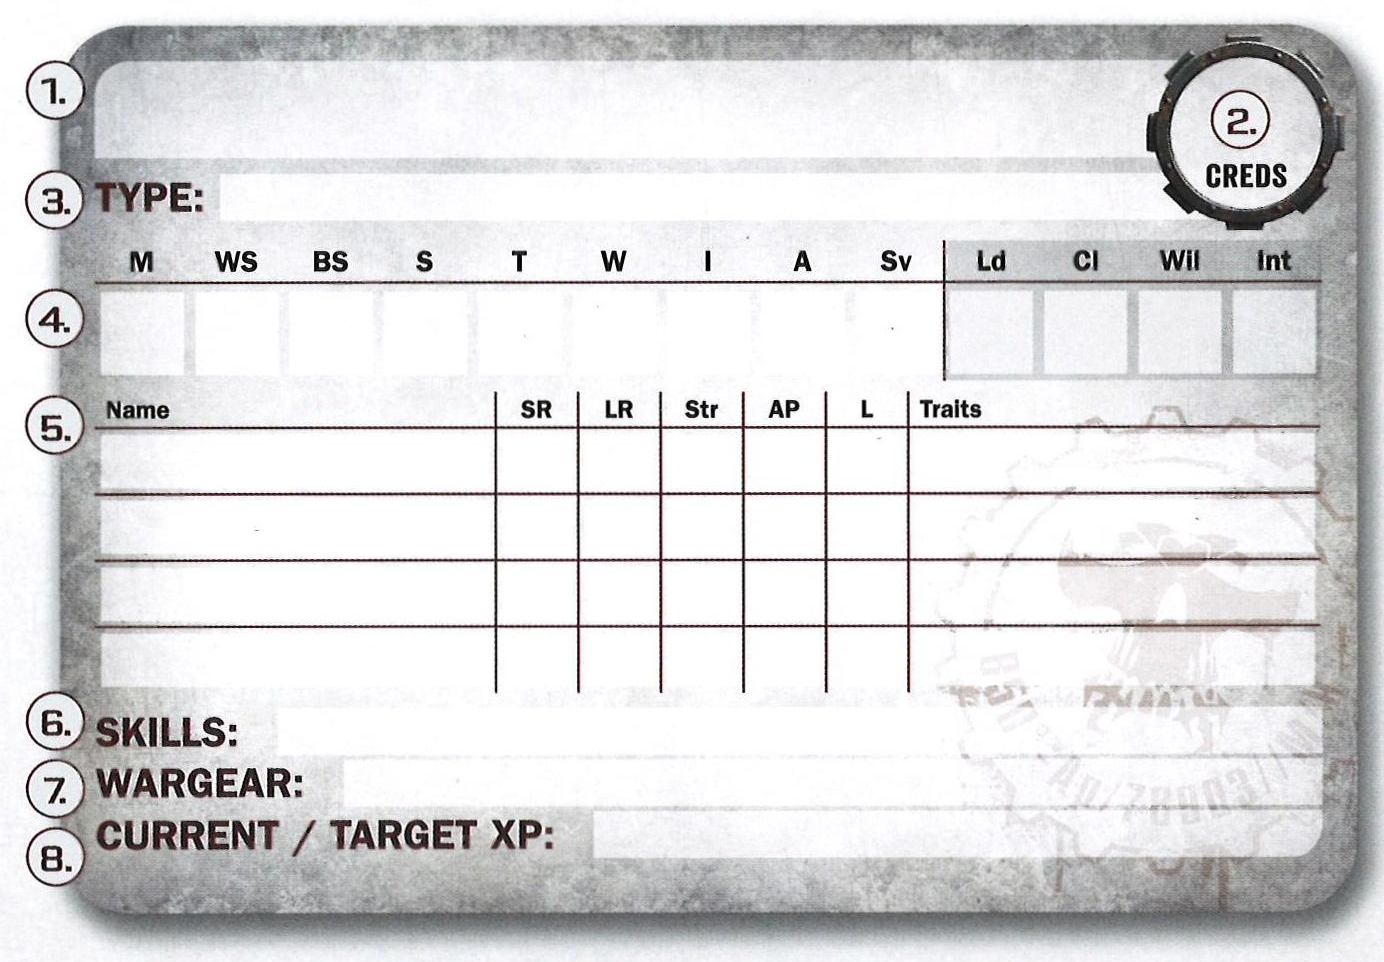
Each Fighter or Vehicle within a player's gang is represented by a model on the battlefield and a Model Card that is filled in with their characteristics, equipment and other useful reference information. Blank Model Cards with the logo of each gang can be found in the various Gang Tactics cards packs.
Each Model Card is split into several areas:
1. The model's name.
2. The model's cost, including all weapons and wargear in credits.
3. The model's Type and any Subtypes.
4. The model's characteristics.
5. The weapons the model is carrying.
6. Any skills the model may have.
7. Any equipment carried by the model.
8. The model's current XP and the threshold at which they gain their next Advancement.